A client on ListingDock asked me to write this tutorial for them. I haven’t posted anything related to Virtualmin in a while. I haven’t had the time. A big thank goes to dap7 for financing this tutorial. So let’s see how to add a sub-domain in Virtualmin.
Before you add a sub-domain in Virtualmin, you need to create it within the domain’s DNS. In this case, DNS was managed by DigitalOcean. Refer to my Adding a Sub Domain with DigialOcean DNS tutorial if you haven’t done this already.
Once you have the sub domain pointing to your droplet, you can move on to Virtualmin part of sub domain creations…
Adding a Sub-domain in Virtualmin
Adding a sub-domain is similar to adding a new domain to your Virtualmin. But instead of creating a new server, you should create a sub-server for your sub-domain. Although creating a top-level server will also work, going with sub-server help you organize your server. So let’s create a sub-server.
 Login to Virtualmin with your root password and select the domain you’re adding the sub-domain from left sidebar. You don’t have to worry about that if you only have one domain on your server. It will be selected by default.
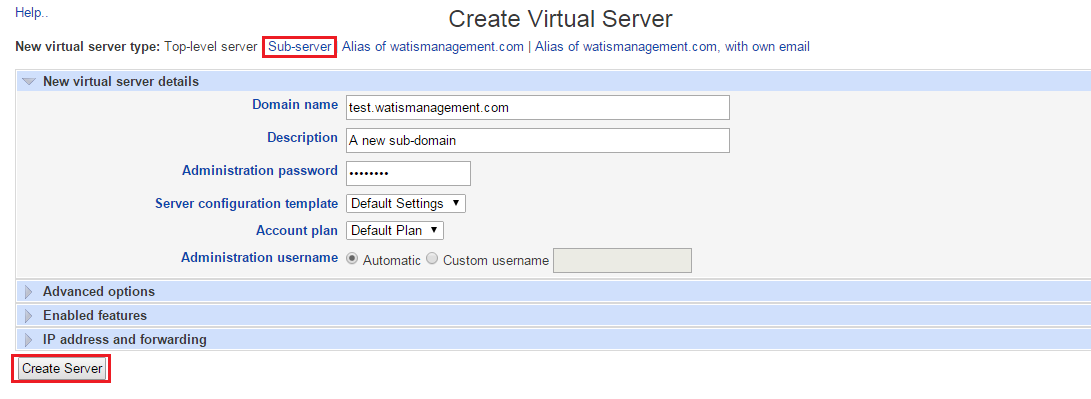
Under the domain name drop-down, you’ll find a link with the text Create Virtual Server. Click it and you’ll be taken to a page where you can create a new server. Top-level server will be selected as the server type, click Sub-server from the top menu to change it to sub-server.
Now type the sub-domain you created in DigitalOcean on the Domain name field. You can type anything you want in the Description field. Don’t change anything else and click Create Server button.

New sub-server will be created within few seconds. Once it’s done, you’ll be given a link to view details of the server you just created on the bottom of the page.
Where to upload website files?
On the page that contain your new server details, you can see admin username for the sub-domain, which will be same as the root domain. And you’ll see home directory for the sub-domain, which will be in following format.
/home/AdministrativeUsername/domains/sub.domain.com
If you go to this directory with a FTP client, you’ll see a directory named public_html inside it. This is where you should upload your website files. Meaning the web-root for your sub-domain will look like this,
/home/AdministrativeUsername/domains/sub.domain.com/public_html
And remember to use your Administrative Username to upload files. Uploading as root will cause permission errors on your website.
You can find MySQL database and password for the server by clicking Edit Databases from the left sidebar. Your sub-domain should be configured properly now. You can now connect to your server with FTP client and upload your website.


Hey thanks for this walkthrough. I’m reaching out cause I’ve had no luck finding answers. I have a domain. xyz.com and I followed your steps to make test.xyz.com. I can access test.xyz.com from inside my network but not from outside. How do I get that part working? Thanks!
What is your network? I don’t understand.
Very good tutorial, i`ve done everything like you said, but cant view site from browser, However if i click “preview website” in virtualmin panel, it loads normally.
Sounds like a networking issue. Please use Virtualmin configuration check tool and see if it reports errors.
Hi Tharindu,
I´m a customer yours and I have a problem: when I sign in in my virtualmin admin panel I have not the option “Create Virtual server”. I looked it but I don´t have in my admin panel.
Please help me.
Regards.
Which account did you use? You should try using root account.
Thanks for your answer mate.
I think that I´m using root account you give me the datas but I think that I have not access to root account.
You can see the datas I have:
https://www.screencast.com/t/7uWVRgeyHFN
Also I see I have a update to phpMyAdmin and I can´t update it say me that I don´t allowed to edit this virtual server:
https://www.screencast.com/t/gsfPrPiG
Also I see that have only one user in my virtualmin.
Also I see “Administration Username”: the username I use.
Enable features:
https://www.screencast.com/t/h7xLdSQL
Thanks a lot for your help mate.
I don’t think you’re using root account. You need to use username ‘root’ instead of your administrative username.
Yes my friend this is my problem.
Thanks a lot for your help! 🙂
Regards.