
Setting a proper hostname is a small but important step in VPS setup. This guide shows how to change hostname on an Ubuntu server correctly so your system, services, and control panels work as expected.
Table of Contents
What Is a Hostname and Why It Matters
A hostname is the name assigned to your server. It helps identify your system on a network and is used by services like mail servers, control panels, and logs.
Using a generic hostname like ubuntu or localhost can cause issues later, especially when setting up email or tools like Virtualmin.
A proper hostname usually looks like:
server.yourdomain.com
This is called a fully qualified domain name (FQDN).
This is part of our VPS Setup series. See more in VPS Basics & Preparation.
When Should You Set the Hostname?
You should set your hostname:
- Right after securing your server
- Before installing Virtualmin or any control panel
- Before configuring mail services
If you haven’t secured your server yet, follow Ubuntu Initial Server Security Guide first.
Check Current Hostname
First, check your current hostname:
hostnamectl
You’ll see something like:
- Static hostname
- Transient hostname
- Operating system
Set a New Hostname
Use hostnamectl to set your new hostname:
sudo hostnamectl set-hostname server.yourdomain.com
Replace server.yourdomain.com with your actual domain.
Update /etc/hosts File
Edit the hosts file:
sudo nano /etc/hosts
Find the line:
127.0.1.1 old-hostname
Replace it with:
127.0.1.1 server.yourdomain.com server
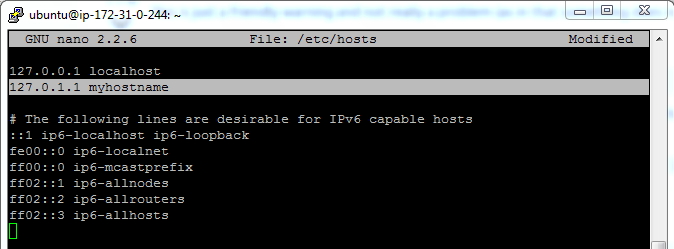
This ensures your hostname resolves correctly locally.
Verify Changes
Check the hostname again:
hostnamectl
Also verify:
hostname
Both should return your new hostname.
Reboot (Optional but Recommended)
Some services may require a reboot:
sudo reboot
Common Mistakes to Avoid
Avoid these common issues:
- Using a hostname without a domain
- Skipping /etc/hosts update
- Using invalid characters
- Not matching DNS records
Your hostname should match your domain’s DNS settings if you plan to host websites or email.
What to Do Next
After setting your hostname, you are ready to install your web server stack.
Next step:
• Install Virtualmin for easier management
OR
• Set up a manual LEMP stack
Follow: Install Virtualmin + Nginx on Ubuntu 24.04 to continue.
Conclusion
Setting the correct hostname ensures your server behaves properly across services and avoids issues later. It’s a simple step, but important for stability and compatibility with hosting tools.
If you’re following the full setup process, continue here: VPS Setup Beginner’s Guide


Is the host name is the domain name that you are pointing at?
In most cases, yes
Hi Tharindu
I have a new VPS and trying to run this command sudo nano /etc/hostname
but it is showing
sudo: nano: command not found
Try this: Fix nano: command not found
apt install nano