All the Self-hosted video streams don’t work the same as the embedded ones. Those video streams consume your website bandwidth more than normal, let alone the big traffic created by the people who watch the live stream together. So, it does matter what web hosting you are using. Because if you need to stream high-quality videos and do it well – without facing a site or a video crash – then you need a strong web hosting plan.
Live videos can be attached through plugins or video platforms to any site or blog, but there are limitations. Not all WordPress themes can support live streaming. Before picking and installing a specific WordPress theme, you need to find out if it can manage multimedia files. Because if it doesn’t, then you can’t proceed, and you’ll need to replace it.
What is OBS?
OBS (Open Broadcaster Software) is an open-source live video production software that can live stream and record video and audio. Let’s see how to live stream using OBS.
First, you need to log into your WordPress website. On your dashboard sidebar, there are the plugins. Go to the plugins and click on add new. Type Wpstream in the search bar. Then install and activate the plugin.
ow on the sidebar, click on the WpStream, and you have to connect an account. Click on this link and create an account in WpStream. After completing the account, go back to the WordPress dashboard and type your email and password that you just used to register yourself in WpStream. Then click on save changes. After that, you’ve been connected to wpstream.net.
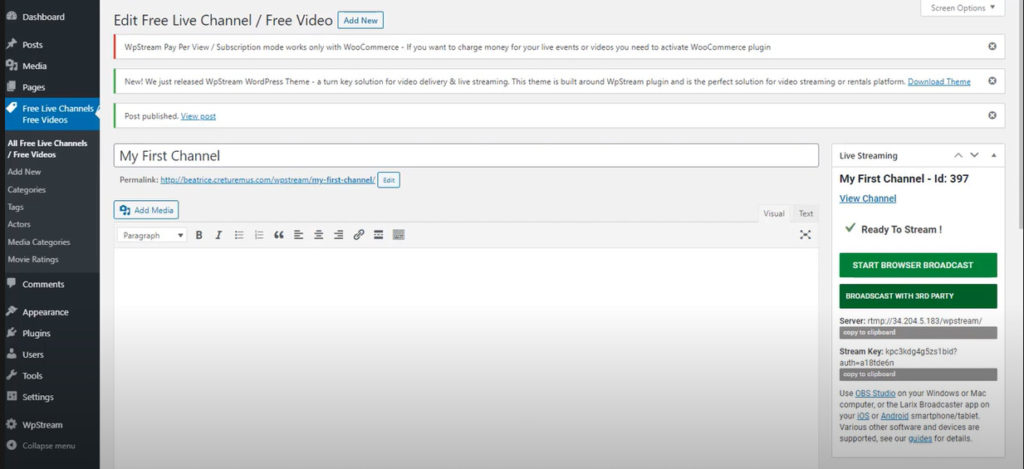
Now on the sidebar, click on add new free live channels/free video on demand. Make sure to give your new channel a name and click on publish. Then you’ll find a permalink show up and click on publish once again. Now you’re going to click on yes to record. And click on the broadcast channel. This is going to take about one or two minutes. After it’s done, click on broadcast with third party. There are the server and stream key.

After copying that server and stream key, open up OBS and go into the settings. Then click on the stream and set it to custom. You need to put in the URL and the stream key and click apply.

Then it will start streaming, and down there, and you can see green lights. That means it is working.
Here we go. It’s now doing a live broadcast using OBS. The link at the top of the page can be used to share your live stream with other people. Remember, it’s also being recorded. So that viewers can access it later as well. If you are done with the streaming, you can stop the stream and go back to our dashboard and click on the WP
stream media management. You can find your recording down in the list.


