Installing and configuring a caching plugin is one of the important things you should do after installing WordPress. Caching helps make WordPress fast and it also takes load off of the web server. WP Super Cache is among most popular caching plugins for WordPress. Let’s install it on Virtualmin-Nginx server.
Installing a caching plugin is easy on most cases. But if you have followed my WordPress setup on Virtualmin-Nginx tutorial, you’ll need few additional steps to get cache working. It’s actually rather common issue for all Nginx servers. Plugin specific Nginx rewrite rules must be add to Nginx configuration for caching to work.
I’m going to assume that you’ve already followed my tutorial or hired me to install WordPress for you. And it’s a good idea to install your theme and other plugins before installing a caching plugin. Also note that WP Super Cache on Nginx is not compatible with WooCommerce. So if you’re using WooCommerce, please use Cache Enabler plugin instead.
Let’s start by login in to Virtualmin as root. Once logged in, go to Webmin > Servers > Nginx Webserver and then click Edit Configuration Files. Select configuration file for your WordPress blog from the drop-down menu. It should look like this,
/etc/nginx/sites-available/domain.com
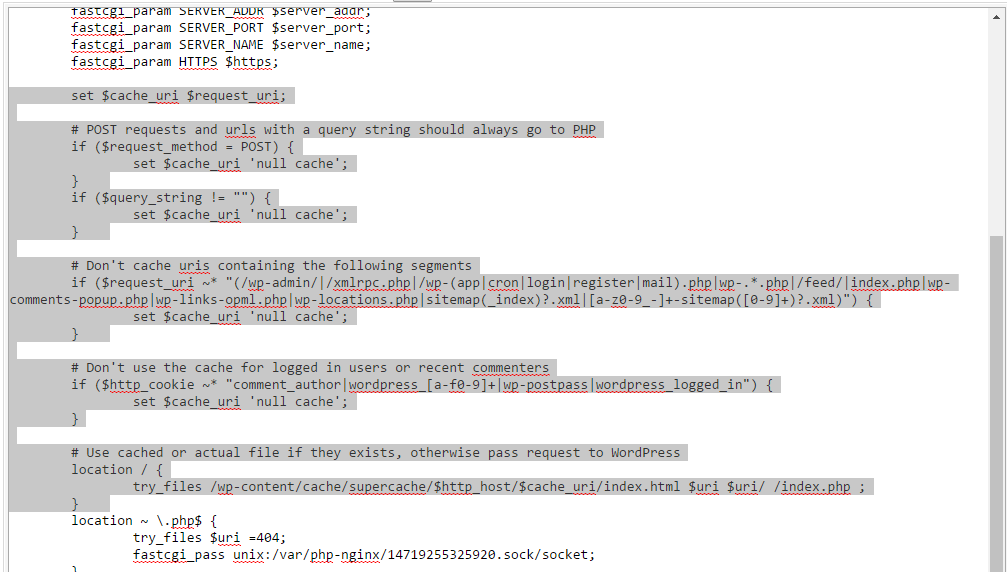
Scroll down and find following 3 lines within the file,
location / {
                try_files $uri $uri/ /index.php?$args;
        }
And replace them with following lines,
set $cache_uri $request_uri;

	# POST requests and urls with a query string should always go to PHP
	if ($request_method = POST) {
		set $cache_uri 'null cache';
	}
	if ($query_string != "") {
		set $cache_uri 'null cache';
	}

	# Don't cache uris containing the following segments
	if ($request_uri ~* "(/wp-admin/|/xmlrpc.php|/wp-(app|cron|login|register|mail).php|wp-.*.php|/feed/|index.php|wp-comments-popup.php|wp-links-opml.php|wp-locations.php|sitemap(_index)?.xml|[a-z0-9_-]+-sitemap([0-9]+)?.xml)") {
		set $cache_uri 'null cache';
	}

	# Don't use the cache for logged in users or recent commenters
	if ($http_cookie ~* "comment_author|wordpress_[a-f0-9]+|wp-postpass|wordpress_logged_in") {
		set $cache_uri 'null cache';
	}

	# Use cached or actual file if they exists, otherwise pass request to WordPress
	location / {
		try_files /wp-content/cache/supercache/$http_host/$cache_uri/index.html $uri $uri/ /index.php ;
	}
Results will look like this,
Save the file. You’ll be taken to the Nginx module’s main page. Click Apply Nginx Configurations and the new rewrite rules will be live. Now go to WordPress and install WP Super Cache plugin. Make sure to use Use mod_rewrite to serve cache files as caching method. You’ll see following warning.
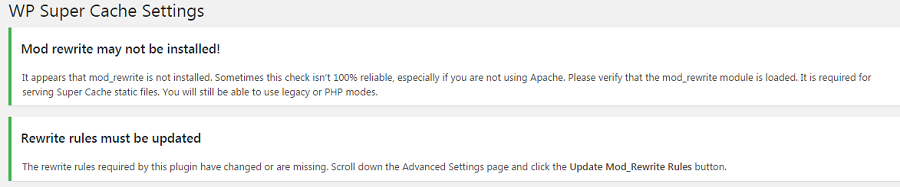
It is safe to ignore this warning. You can confirm if the cache is working by going to Easy tab and clicking Test Cache button. Feel free to play with plugin settings and find the best configuration for your website. Leave a comment if you have any problems during the setup.