A web application firewall AKA WAF is a must have piece of software for any website. They help protect websites against application specific attacks. Which unfortunately out of the scope of traditional firewall software like UFW or iptables. There are a few WAF software out there. I like Naxsi because it’s easy to setup and use. Also it’s free. So today we’ll install Naxsi WAF for Nginx and Virtualmin on
Ubuntu 20.04
.Naxsi is specially designed for Nginx. It is a third-party module for Nginx. According to the developers, Naxsi doesn’t rely on a signature base like an antivirus, and thus cannot be circumvented by an “unknown” attack pattern. It has simple rules that can prevent 99% of known patterns involved in website vulnerabilities. This tutorial will help you install Naxsi WAF for Nginx and Virtualmin on
Ubuntu 20.04
and protect all your hosted websites against application specific attacks.Before you start, make sure your
Ubuntu 20.04
server is up and running with Virtualmin and Nginx. You can use my tutorial to install Virtualmin on aUbuntu 20.04
VPS with nginx. It doesn’t matter if you already have websites hosted on your VPS or not. But you need to pay extra attention to details if you’re going to do this on a production server. And you should also know the risks. Because we’re about to recompile nginx.Recompile Nginx with Naxsi WAF
Let’s start by installing dependencies,
apt install libpcre3-dev libssl-dev libxml2-dev libxslt-dev libgd-dev libgeoip-dev
Virtualmin installation script installs Nginx version bundled with
Ubuntu 20.04
. Which is Nginx v1.10.3 at the moment of writing. You can check Nginx version currently installed with following command.nginx -v
Once you have the nginx version to recompile, navigate to opt directory.
cd /opt
Download nginx. You need to change nginx version number on following command if it’s different from the one installed on your system.
wget http://nginx.org/download/nginx-1.22.1.tar.gz
Extract downloaded file,
tar -xvzf nginx-1.22.1.tar.gz
Now download Naxsi,
git clone --recurse-submodules https://github.com/wargio/naxsi.git
Navigate to extracted nginx directory,
cd nginx-1.22.1
Now it’s time to recompile nginx with Naxsi. But before that, we need to find original configure arguments for nginx. Following command should do it.
nginx -V
Output:

You need to copy these configure arguments to a text editor. Because we need to make some adjustments to these arguments and build a new configure command. Following are the adjustments you need to do.
- Add ./configure to the beginning of configure arguments.
- Remove all dynamic modules. These are the arguments that begin with –add-module=
- Add new argument –sbin-path=/usr/sbin/nginx towards the beginning.
- Add new argument –add-module=/opt/naxsi/naxsi_src/ towards the beginning.
The two new arguments we added enable Naxsi and make sure Nginx paths are kept same as before. Keeping nginx paths same as before make sure Virtualmin compatibility with recompiled nginx. My configure command looks something like below after the adjustments.
./configure --with-cc-opt='-g -O2 -ffile-prefix-map=/build/nginx-TNaH8h/nginx-1.22.1=. -flto=auto -ffat-lto-objects -flto=auto -ffat-lto-objects -fstack-protector-strong -Wformat -Werror=format-security -fPIC -Wdate-time -D_FORTIFY_SOURCE=2' --with-ld-opt='-Wl,-Bsymbolic-functions -flto=auto -ffat-lto-objects -flto=auto -Wl,-z,relro -Wl,-z,now -fPIC' --prefix=/usr/share/nginx --sbin-path=/usr/sbin/nginx --conf-path=/etc/nginx/nginx.conf --add-module=/opt/naxsi/naxsi_src/ --http-log-path=/var/log/nginx/access.log --error-log-path=/var/log/nginx/error.log --lock-path=/var/lock/nginx.lock --pid-path=/run/nginx.pid --modules-path=/usr/lib/nginx/modules --http-client-body-temp-path=/var/lib/nginx/body --http-fastcgi-temp-path=/var/lib/nginx/fastcgi --http-proxy-temp-path=/var/lib/nginx/proxy --http-scgi-temp-path=/var/lib/nginx/scgi --http-uwsgi-temp-path=/var/lib/nginx/uwsgi --with-compat --with-debug --with-pcre-jit --with-http_ssl_module --with-http_stub_status_module --with-http_realip_module --with-http_auth_request_module --with-http_v2_module --with-http_dav_module --with-http_slice_module --with-threads --with-http_addition_module --with-http_gunzip_module --with-http_gzip_static_module --with-http_sub_module
Once you have your configure command ready, go ahead and stop nginx.
service nginx stop
And then execute the configure command. Once it’s completed, install nginx with following commands.
make
make install
Now start nginx,
service nginx start
Check the configure arguments again and verify changes are there.
nginx -V
If everything is okay, lock nginx so the package manager won’t overwrite our custom binary.
apt-mark hold nginx
That’s it for installation. Now let’s configure and enable Naxsi.
Configure Naxsi WAF with Nginx on
Ubuntu 20.04
Naxsi WAF is installed but not enabled yet. We need to copy it’s core ruleset to nginx config directory first.
cp /opt/naxsi/naxsi_rules/naxsi_core.rules /etc/nginx
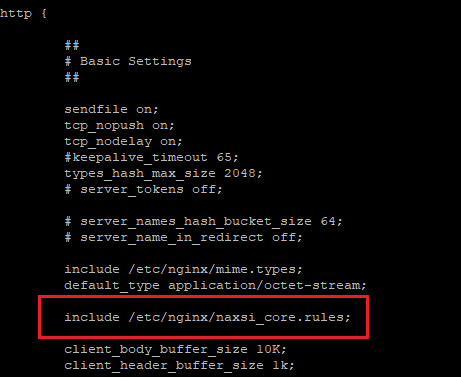
Now enable Naxsi WAF by including core rules on the http block of nginx main configuration. So open nginx main configuration file.
nano /etc/nginx/nginx.conf
Add following line within the http {} block.
include /etc/nginx/naxsi_core.rules;
Here’s how it looks on my VPS,
Save and close the file. Next we’ll create a new file to hold Naxsi options for example.com.
nano /etc/nginx/example.com.rules
Paste the following options,
# Sample rules file for vhost.
LearningMode;
SecRulesEnabled;
#SecRulesDisabled;
DeniedUrl "/RequestDenied";

## check rules
CheckRule "$SQL >= 8" BLOCK;
CheckRule "$RFI >= 8" BLOCK;
CheckRule "$TRAVERSAL >= 4" BLOCK;
CheckRule "$EVADE >= 4" BLOCK;
CheckRule "$XSS >= 8" BLOCK;
error_log /var/log/virtualmin/example.com_log;
These options enable Naxsi WAF in learning mode. You need to put a # in front of the line that says LearningMode; to disable learning mode and start blocking connections.
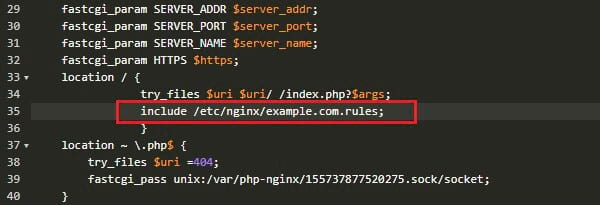
The file example.com.rules has to be loaded on a per location basis for a server block. Server blocks are inside each domain’s configuration file. Let’s enable Naxsi for example.com,
nano /etc/nginx/sites-available/example.com.conf
And add following line to the main location block,
include /etc/nginx/example.com.rules;
Here’s how my main location block looks like after including example.com.rules.
Save the file and restart nginx,
service nginx restart
That’s it. You need to include a example.com.rules file in each server block to enable Naxsi for that server block. All events will be recorded to the error log file specified in example.com.rules file. You can have separate rules file per each server block. That way you’ll get separate error logs for each of your domains and toggle Learning Mode On and Off for each individual domain.
That concludes the instructions to install Naxsi WAF for Nginx and Virtualmin. Create a topic on sysadmin forum if you have issues with the installation.