If you’re a small business owner looking to take your business online, you’ll need an eCommerce solution where your customers can buy your products and services online. PrestaShop offers exactly that. This tutorial will show you how to install PrestaShop on VPS with Virtualmin and Nginx.
PrestaShop is freemium software, meaning it’s free to use. But you’ll need to purchase addons to extend its functionality. We at vpsfix.com observed that most of the essential functions for an eCommerce website are either included in the PrestaShop core or available as free addons. So, PrestaShop is worth a try. For anyone who decides to utilize PrestaShop as their eCommerce platform,
Prerequisites for PrestaShop on VPS
Our high-performance server setup using Virtualmin and Nginx requires you to have an unmanaged VPS. These are not typical and expensive VPS you may find on the market. They are inexpensive and self-managed. You can get one from our recommended unmanaged VPS providers list. And when you’re creating a server for your PrestaShop website, make sure it’s a
Ubuntu 20.04
Next, you’ll need a domain name, which you can get from NameCheap. But I assume you already have a domain name for your eCommerce shop.
Okay, let’s move to the initial server configuration. Complete the following tutorials one-by-one in that order. They will lay the fundation for a high performance PrestaShop eCommerce website which include
PHP v8.0
,Nginx v1.22
andMySQL v8
on top ofVirtualmin v7.1 GPL
control panel.Once you complete above steps, your unmanaged VPS is ready for most web applications out there.
PHP Version Requirement for PrestaShop
According to the official system requirements page, PrestaShop only supports PHP v7.4 at the moment of writing. But our server setup installed
PHP v8.0
on the server. This isn’t something to worry about because our server setup already has support for all major PHP versions. Head over to multiple PHP versions on a single server tutorial and install PHP v7.4. Don’t forget to configure your domain to use PHP v7.4 following the sub-topic “Configure Virtualmin to use a Specific PHP Version” on the multi-PHP tutorial.PHP Versions May Change
Install PrestaShop onUbuntu 20.04
VPS
We’re finally ready to install PrestaShop on VPS now. SSH into your server and change to your domain’s Administration User account with the following command. Change admin_user with your actual username.
su admin_user
Navigate to public_html directory.
cd $HOME/public_html
Download the latest version of PrestaShop to the public_html directory. Letest stable version of PrestaShop is v1.7.8.5 at the moment of writing. Check the current stable version on PrestaShop versions page and manipulate the version number on below command to get the latest version.
wget https://www.prestashop.com/en/system/files/ps_releases/prestashop_1.7.8.5.zip
Unzip downloaded zip file,
unzip prestashop_*.zip
The file you just unzipped contains another zip file inside it. But we don’t need to worry about it. You can move on to the next step of the tutorial.
Add Nginx Rewrite Rules for PrestaShop
Rewrite rules make sure PrestaShop is compatible with Nginx. Most PHP software out there needs Nginx rewrite rules to function properly on LEMP environment. PrestaShop isn’t any different. We’ll take care of it in this section.
You need to switch back to the server root account for this part. Simply type exit on the terminal to switch back to root account. Now we’ll open your PrestaShop domains Nginx configuration file with the following command. Remember to replace example.com with your actual domain name.
nano /etc/nginx/sites-available/example.com.conf
Now search for the following line within the file,
fastcgi_param HTTPS $https;
Then, paste the following lot in a new line just after the above line.
					location / {
    rewrite ^/api/?(.*)$ /webservice/dispatcher.php?url=$1 last;
    rewrite ^/([0-9])(-[_a-zA-Z0-9-]*)?(-[0-9]+)?/.+\.jpg$ //cdn.vpsfix.com/img/p/$1/$1$2.jpg last;
    rewrite ^/([0-9])([0-9])(-[_a-zA-Z0-9-]*)?(-[0-9]+)?/.+\.jpg$ //cdn.vpsfix.com/img/p/$1/$2/$1$2$3.jpg last;
    rewrite ^/([0-9])([0-9])([0-9])(-[_a-zA-Z0-9-]*)?(-[0-9]+)?/.+\.jpg$ //cdn.vpsfix.com/img/p/$1/$2/$3/$1$2$3$4.jpg last;
    rewrite ^/([0-9])([0-9])([0-9])([0-9])(-[_a-zA-Z0-9-]*)?(-[0-9]+)?/.+\.jpg$ //cdn.vpsfix.com/img/p/$1/$2/$3/$4/$1$2$3$4$5.jpg last;
    rewrite ^/([0-9])([0-9])([0-9])([0-9])([0-9])(-[_a-zA-Z0-9-]*)?(-[0-9]+)?/.+\.jpg$ //cdn.vpsfix.com/img/p/$1/$2/$3/$4/$5/$1$2$3$4$5$6.jpg last;
    rewrite ^/([0-9])([0-9])([0-9])([0-9])([0-9])([0-9])(-[_a-zA-Z0-9-]*)?(-[0-9]+)?/.+\.jpg$ //cdn.vpsfix.com/img/p/$1/$2/$3/$4/$5/$6/$1$2$3$4$5$6$7.jpg last;
    rewrite ^/([0-9])([0-9])([0-9])([0-9])([0-9])([0-9])([0-9])(-[_a-zA-Z0-9-]*)?(-[0-9]+)?/.+\.jpg$ //cdn.vpsfix.com/img/p/$1/$2/$3/$4/$5/$6/$7/$1$2$3$4$5$6$7$8.jpg last;
    rewrite ^/([0-9])([0-9])([0-9])([0-9])([0-9])([0-9])([0-9])([0-9])(-[_a-zA-Z0-9-]*)?(-[0-9]+)?/.+\.jpg$ //cdn.vpsfix.com/img/p/$1/$2/$3/$4/$5/$6/$7/$8/$1$2$3$4$5$6$7$8$9.jpg last;
    rewrite ^/c/([0-9]+)(-[_a-zA-Z0-9-]*)(-[0-9]+)?/.+\.jpg$ //cdn.vpsfix.com/img/c/$1$2.jpg last;
    rewrite ^/c/([a-zA-Z-]+)(-[0-9]+)?/.+\.jpg$ //cdn.vpsfix.com/img/c/$1.jpg last;
    rewrite ^/([0-9]+)(-[_a-zA-Z0-9-]*)(-[0-9]+)?/.+\.jpg$ //cdn.vpsfix.com/img/c/$1$2.jpg last;
    try_files $uri $uri/ /index.php?$args;
    }

    # AlphaImageLoader for IE and fancybox
    rewrite ^images_ie/?([^/]+)\.(jpe?g|png|gif)$ js/jquery/plugins/fancybox/images/$1.$2 last;

    # Web service API
    rewrite ^/api/?(.*)$ /webservice/dispatcher.php?url=$1 last;

    # Installation sandbox
    rewrite ^(/install(?:-dev)?/sandbox)/(.*) /$1/test.php last;

    # admin folder
    location /admin {
        if (!-e $request_filename) {
            rewrite ^/.*$ /admin/index.php last;
        }
    }

    # Source code directories
    location ~ ^/(app|bin|cache|classes|config|controllers|docs|localization|override|src|tests|tools|translations|travis-scripts|vendor|var)/ {
        deny all;
    }
    # Prevent exposing other sensitive files
    location ~ \.(yml|log|tpl|twig|sass)$ {
        deny all;
    }
Save and close file by hitting Ctrl+X and then Y. Then restart nginx web server,
service nginx restart
That concludes the technical part of the installation. But it isn’t over yet. The final step is to complete the PrestaShop web installer.
Complete PrestaShop Web Installation
PrestaShop comes with a nice web-installer. They call it the PrestaShop Installation Assistant. You can reach it by opening your PrestaShop domain in the browser. You’ll be greeted by a page similar to this.
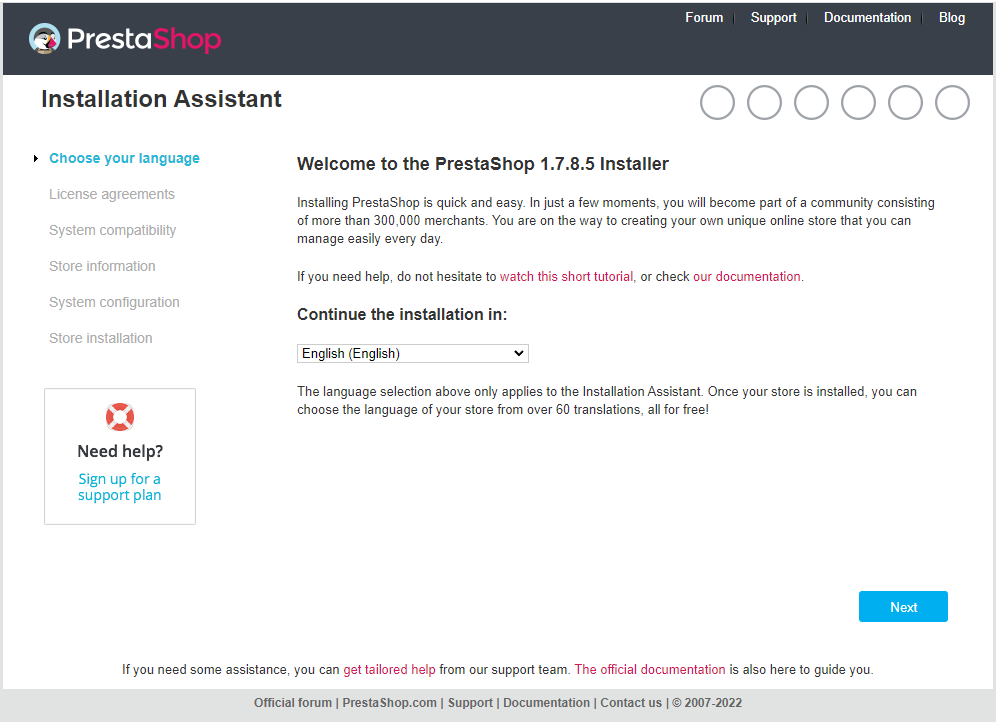
Things are pretty self-explanatory from here. The installer will perform varias tasks and checks during each step of the installation. You’ll be asked to provide MySQL database credentials on the System Configuration.
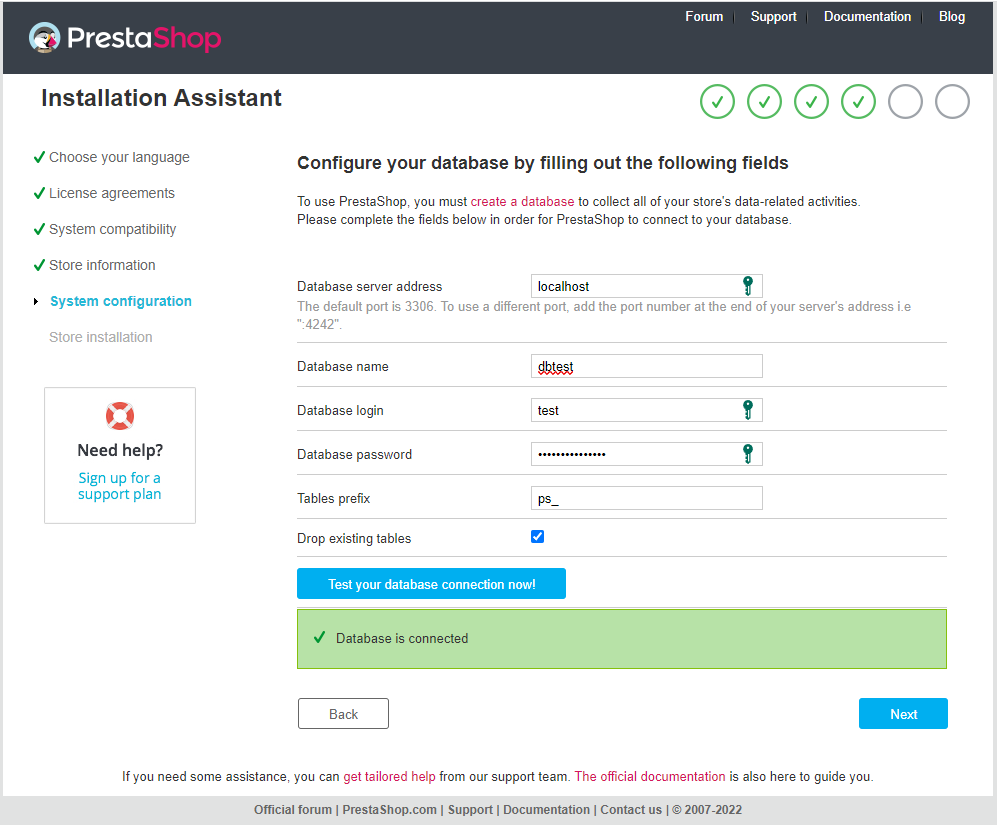
Virtualmin had already created a MySQL database for your PrestaShop during the domain creation. You can obtain MySQL database credentials from Virtualmin.
Go through with the rest of the web installer steps to have PrestaShop installed on a high-performance VPS using Virtualmin and Nginx. You’ll be asked to delete /install directory from your server upon web installer completion. Following command will take care of it. Remember to substitute admin_user with your domain’s administration username.
rm -rf /home/admin_user/public_html/install
And that’s it! You’ve successfully installed PrestaShop on VPS with Virtualmin and Nginx. Now it’s time to set up your products and make some sales. Good Luck! If you have problems with the installation, feel free to create a topic on our Server Administration Forum.