
When you first create an Amazon EC2 instance, you’re offered to download a key file which you can use to get access to your instance via SSH. Since the password logins are disabled by default on all EC2 instances, key pairs are the only way you can authorize yourself to the instance. This post will guide you to using Key Pairs to login to an Amazon EC2 Instance with Putty on Windows PC.
Few days ago, I posted an article about creating an Amazon EC2 instance that can be later used as a web server. During the setup, I guided you to download the keyfile and keep it in a secure place. The keyfile was in PEM format. In order to use this key with PuTTY, you must to convert it to PPK file format. PuTTY doesn’t support .pem keys by default. But it can be easily converted to PuTTY’s own format.
Convert PEM Keyfile to PuTTY Private Key File Format Using PuTTYGen
You need PuTTYgen installed on your PC to convert .pem file to .ppk. PuttyGen is part of PuTTY utilities. But it can be installed individually if you want. Head over to PuTTY download page and download puttygen.exe. It’s a very tiny piece of software and shouldn’t take long to download and install.
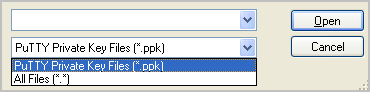
Launch the program from start menu and click load button. A window will open allowing you to browse and select files from your PC. Make sure you set file type to All Files (*).
Then browse and open keyfile you downloaded from AWS EC2 creation process. PuTTY will then convert PEM keyfile to its own format. A little notice will appear confirming the conversion. You must then save converted PPK on your PC. Click Save Private Key and save it to somewhere safe and secure. You’ll get a warning message asking you to confirm saving of keyfile without passphrase. Simply clicking yes will save the file. Passphrase adds extra security to your keyfile. You must use it if you’re on a shared computer.
Configuring PuTTY to Use Converted Keyfile
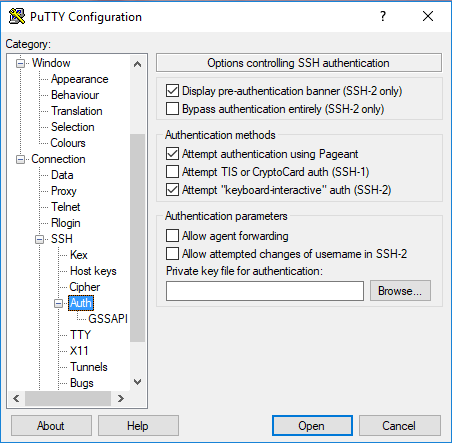
Now you need to download and install putty.exe which will allow you to connect to your instance through SSH. After installing it on your PC, you must configure PuTTY to use keyfile instead of password. Launch PuTTY SSH Client and go to Connection > SSH > Auth from the category tree on the left. Use Browse button to browse and open converted keyfile.
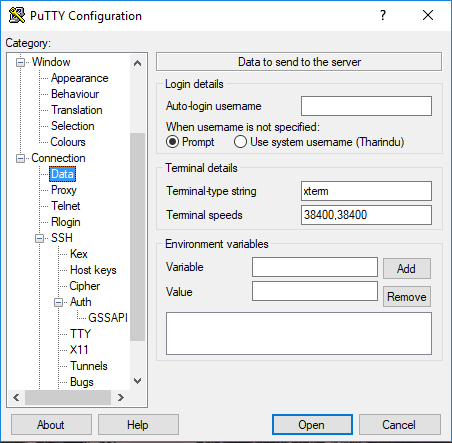
Next we’ll configure auto-login with PuTTY so we don’t have to type the username each time we login. This can be set under Connection > Data. Type ubuntu as your auto-login username.
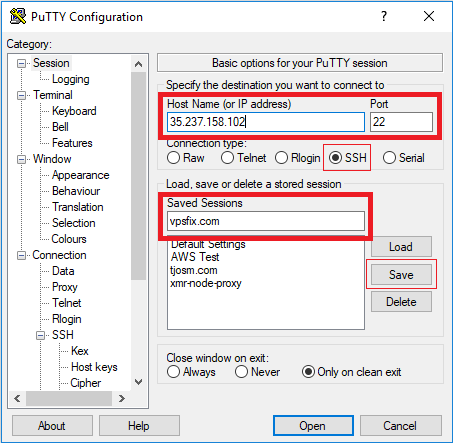
Then go to Session from category tree and type Amazon Elastic IP address assigned to your instance in the Host Name field. Make sure SSH is ticked on Connection Type and Port is set to 22. Give your instance a name in the saved sessions section and click Save button. Your information will be saved to PuTTY and name you gave to your instance will appear below Default Settings in saved sessions section.
Clicking instance name and then Open at bottom of the window will open SSH terminal. You’ll be authenticated to server with private key on your PC and connected to server command line where you can run commands to install web server and do much more. But before you execute commands, switch to root user account with following command.
sudo -i
This is because all my tutorials assume you’re executing commands as root user, unless specified otherwise. Now that you’re in the root account, you should set a password for root with following command.
passwd
You can now install Virtualmin with LEMP on your EC2 instance. And optionally enable root account and password based logins on your EC2 instance if you prefer to login with a password instead of SSH key file.


when trying to connect ssh it shows “connection timed error”
You probably have some error in your Security Policy. Please check if port 22 is open in your EC2 security policy. If it’s open, check if there are any IP based restrictions.