
Hackers are bad people. They are consistently scanning our servers for vulnerabilities. We need to have a solid security setup in order to stay safe from these evil people. This post will show you few things you can do to secure your Virtualmin &
Ubuntu 20.04
.Importance of Proper Security
There are many tutorials out there showing you how to configure a VPS to host websites. The problem with these tutorials are that they barely even cover 10% of the process. Sure you can get your website up and running within few hours, or even within few minutes if you’re familiar with Linux CLI. But configuring an Unmanaged VPS involve much more work than what is being covered on these tutorials. Most important thing they overlook is security. To get an idea of how serious of an issue this is, take a look at the screenshot on the right. The image shows failed login attempts during period of 2 weeks on one of my Managed VPS servers. This is a brute-force attack which never stops. Done by hackers using bots, they never stop trying to guess your root password. If left unanswered, it’s about time someone break in to your VPS. That’s why it’s important have proper security to counter these threats.
First Step Towards Safety
Prerequisites
Some of the steps to secure Virtualmin &
Ubuntu 20.04
described in this post can be performed right after booting your VPS for the first time. But since I want to cover all steps involved in this post, You should complete following steps before continuing.
Get your VPS Secured
Get your VPS disinfected and secured against attacks by an experienced Linux Server administrator for a small one time fee. Our service include,
- Real-time Malware Scanning Setup
- UFW and Fail2Ban Setup
- Web Application Firewall Setup
- SSH Hardening
- And more...
Monthly VPS Management
Get a professional Linux Server Administrator maintain your VPS on daily basis for a small monthly fee. Our service include,
- Daily Malware Scanning
- Daily Off-site Backups
- Enhanced Server Security & Firewall
- Weekly Server Updates & patches
- And more...
Disable FirewallD onUbuntu 20.04
FirewallD is a front-end to iptables. It is installed with Virtualmin by default. It works out of the box with Virtualmin as the Virtualmin installation script configures it during the initial server setup. We’ll be disabling FirewallD as we need to use UFW to block intruder IPs.
UFW is also a front-end to iptables. I find it easier to manage than FirewallD. And UFW is also essential for this tutorial. So let’s stop FirewallD.
service firewalld stop
FirewallD is set to start at system boot. This will conflict with UFW. So let’s disable FirewallD at boot.
systemctl disable firewalld
Now that the FirewallD is disabled, we can enable UFW and configure it as needed.
Enable UFW to Secure Virtualmin &Ubuntu 20.04
UFW is a program with simple set of commands. It’s really easy to get started with UFW comparing to iptables. UFW is available by default in
Ubuntu 20.04
. But it’s not enabled. We’ll enable it shortly. We must add firewall rules first, or at least allow connections on SSH port before enabling it. Or else, we’ll be locked out of our VPS.Let’s allow few programs that we’re going to use. Following commands will open port 22, 80, 443 and port 10000 in firewall.
ufw allow ssh
ufw allow 'Nginx Full'
ufw allow webmin
Opening these ports are mandatory for operation of your VPS. And when you enable UFW with these ports opened, all other ports will be closed. So if you’re using other services, you need to allow relevant ports as well. I’ve posted a list of ports that you might need to be opened.
Let’s look at an example where you want to host your DNS on the same VPS. In this case, you need to allow port 53 in firewall. You can use following command to allow it.
ufw allow 53
And when you’re done adding all the ports you’re going to be using, you can enable UFW with following command.
ufw enable
And you can confirm if UFW is active with following command.
ufw status verbose
If you got this far with this tutorial, you have a solid protection against basic attacks. But it’s not all you can do to protect your VPS. There are things like changing default ports and disabling password. But they make things a bit complicated for newbies. And this gives enough protection unless you’re high profile target for hackers.
Configure Fail2Ban to Secure Virtualmin &Ubuntu 20.04
Fail2Ban is an intrusion prevention software. The Virtualmin installation script installs it on your VPS. All we have to do now is configure it.
Editing the Correct Configuration File
So let’s open Fail2ban jail.local file,
nano /etc/fail2ban/jail.local
File should already contain configuration added by Virtualmin. We’re going to make few changes to these configuration. Delete everything from the file and paste following lot.
[sshd]

enabled = true
port    = ssh
maxretry = 3
findtime = 10800
bantime = 86400
action = ufw

[ssh-ddos]

enabled = true
port    = ssh,sftp
filter  = sshd-ddos
maxretry = 3
findtime = 10800
bantime = 86400
action = ufw

[webmin-auth]

enabled = true
port    = 10000
maxretry = 3
findtime = 10800
bantime = 86400
action = ufw

[proftpd]

enabled  = true
port     = ftp,ftp-data,ftps,ftps-data
maxretry = 3
findtime = 10800
bantime = 86400
action = ufw

[postfix]

enabled  = true
port     = smtp,465,submission
logpath  = /var/log/mail.log
maxretry = 5
findtime = 10800
bantime = 86400
action = ufw

[dovecot]

enabled = true
port    = pop3,pop3s,imap,imaps,submission,465,sieve
logpath  = /var/log/mail.log
maxretry = 5
findtime = 10800
bantime = 86400
action = ufw

[postfix-sasl]

enabled  = true
port     = smtp,465,submission,imap3,imaps,pop3,pop3s
logpath  = /var/log/mail.log
maxretry = 5
findtime = 10800
bantime = 86400
action = ufw
These configuration protects SSH server, FTP server and Mailserver against brute-force attacks. If we take first section (sshd) for an example, the additional lines I added tells Fail2Ban to look for failed login attempts during last 3 hours and if someone exceed 3 failed login attempts then ban their IP for 24 hours using UFW. You can play with these settings and configure Fail2Ban as you need. And when you’re finished configuring jails, activate them by restarting Fails2Ban.
service fail2ban restart
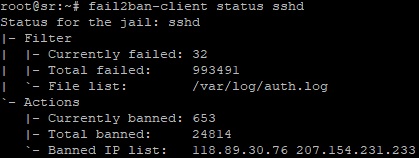
You can verify active Fail2Ban jails with following command.
fail2ban-client status
And you can view stats for individual jails by adding the jail name to end of the above command. So if you want to view stats for SSH jail, you can use following command.
fail2ban-client status sshd
Fail2Ban will protect your VPS from brute-force attacks from hereon. And it will ban intruder IPs with UFW.
If you got this far with this tutorial, you have a solid protection against basic attacks. But it’s not all you can do to protect your VPS. There are things like changing default ports and disabling password. But they make things a bit complicated for newbies. And this gives enough protection unless you’re high profile target for hackers.
Further Security for your VPS and Websites
What you did so far doesn’t necessarily give all the protection your VPS needs. We had to keep few ports open that are still vulnerable to attacks. Well, we can protect most ports we opened with Fail2Ban except for port 80 and port 443. These ports are used by Nginx and are public. Connecting to these ports and accessing public content on your website should not require a password. And when there’s no login required, Fail2ban can’t protect you.
Answer to this problem is a WAF. A WAF works on top of your webserver and protects it against attacks like SQL injection and cross-site scripting. The WAF I recommend for my setup is Naxsi. Go ahead and install Naxsi WAF for Nginx and Virtualmin to further protect your server.
That concludes the instructions to secure Virtualmin &
Ubuntu 20.04
VPS. Create a topic on sysadmin forum if you have issues with the installation.


HI, just read your article on How to Secure Virtualmin & Ubuntu 16.04 VPS.
My question is what did you do with firewalld? Virtualmin installs it by default.
Did you uninstall and disable it? does that break anything in virtualmin?
I simply disable FirewallD.