
Emails are an important part for any online business. Most communication between clients and owners are carried out through emails. As important as it is, it is also the most complicated part of a server setup. One miss-configuration on your server and emails will end up in receivers spam folder. This tutorial will help you configure domain specific emails with Virtualmin and avoid emails going to spam folder.
I’m only focusing on mail server configuration on this tutorial. ISPs usually also scan content of emails to detect spam. That is not something I can answer. And that is not a major concern for most people unless they are sending out promotional emails. A mail server on the same server as your website should only be used for transactional emails like welcome emails, password reset emails, etc… and for your personal email addresses like name@example.com.
Setting up a mail server is really easy. In fact Virtualmin does this automatically. Your domain specific emails are ready to use as soon as you add your domain to Virtualmin. But emails will most definitely go to spam folder. Preventing that from happening is what makes it really complicated. There are few configurations that need to be done to avoid it. Let’s start with prerequisites.
 Not a tech guy? Rather have a freelancer setup mail server on VPS for you?
Hire me and have your mail server ready within 24 hours!
Get Mail Server Installed
Prerequisites
This tutorial is intended for people who are configuring unmanaged VPS to host their websites. But it should not stop anyone from using it just to get domain specific emails like name@example.com without actually setting up a website. In either case, you need to get an unmanaged VPS and complete following steps.
These steps will get your VPS configured with Virtualmin server panel on top of a LEMP stack. You’re free to install your CMS before or after setting up mail server. It doesn’t really matter as long as you have completed above prerequisites.
Add mail.example.com as an Alias
We’ll start with a workaround that will get SSL working for Postfix. You need to have Let’s Encrypt enabled on your top-level server for this to work. Your mail server will work without completing this step. But a signed SSL certificate is essential when you’re connecting to your mail server from email clients.
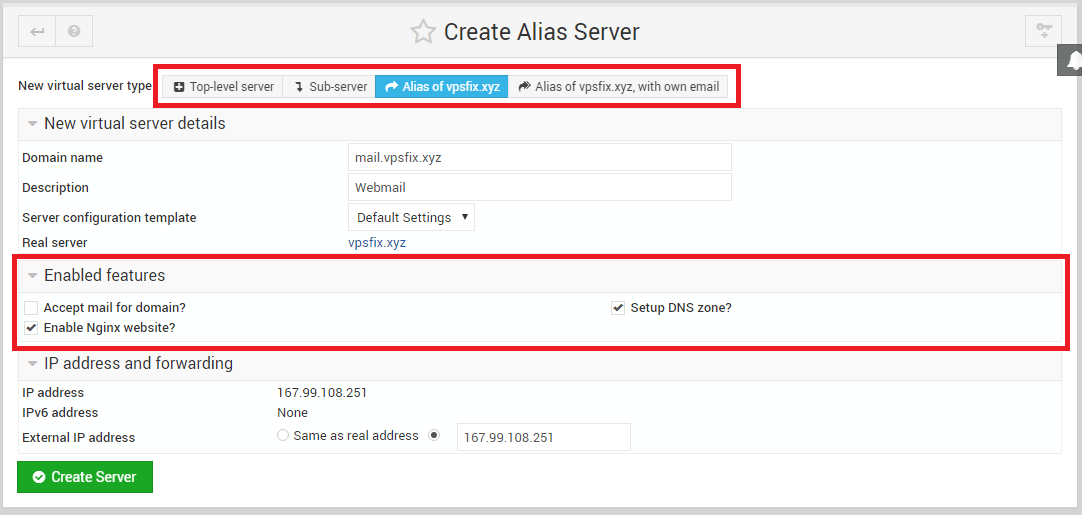
Although the prerequisites guided you to enable SSL for your domain. It does not include mail.example.com. Email clients will show a warning due to this. Easiest way to fix it is by adding mail.example.com as an alias of your top-level server. Virtualmin will then automatically request and update your SSL certificate to include mail.example.com.
And it’s easy to add an alias with Virtualmin. Select your domain from the dropdown and then click Create Virtual Server. Fill in the information like below and create the alias.
Now go back to SSL certificates section of your top-level server and copy SSL certificate to Dovecot and Postfix, just like you did for Virtualmin.
Configure rDNS for your IP Address
Second step is to configure rDNS. Just like your domain name resolves to VPS IP address. Your VPS IP address should resolve to your domain name. This is not something you can setup on DNS settings. You get your IP address from your VPS provider, so this needs to be setup on your VPS provider’s side.
Method of creating a rDNS record differ from provider to provider. On DigitalOcean, you just need to rename your droplet like this,
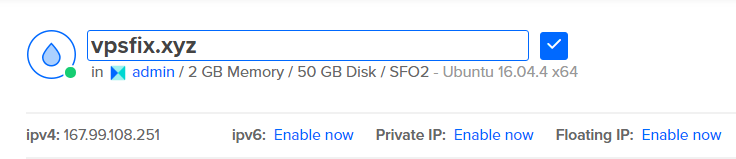
Make sure to use your domain name as your droplet name. If you’re on Vultr, refer to thier Reverse DNS documentation. If you’re using a different VPS provider, refer to their KB documentation. Make sure your IP address resolves to your domain name. Not to a subdomain, not to anywhere else.
Setup DKIM Record
DKIM is a way of ‘signing’ emails to prove they came from you. You publish a public key to domain DNS and sign emails with a private key. Receiving mail server can then use these keys and authenticate your emails. This sounds like lot of work. But it only needs one time setup with Virtualmin. Let’s set it up.Login to Virtualmin as root user and go to Virtualmin > Email Settings > DomainKeys Identified Mail. You probably won’t have DKIM filter installed on your server. Virtualmin will give you an option to install it. Do it and then configure DKIM like below,
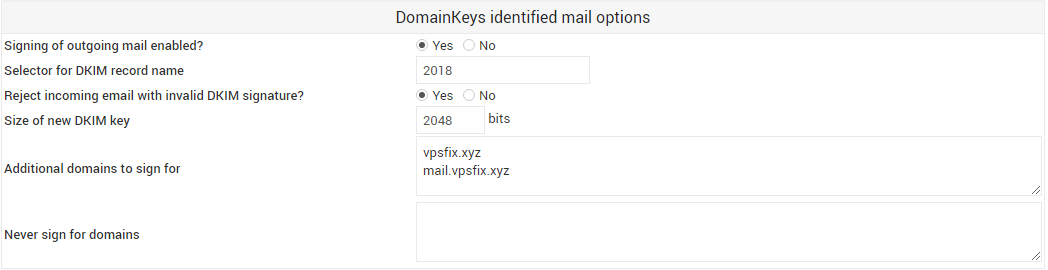
Mail.example.com is automatically configured by Virtualmin as your mail server hostname. It is important that you add it under ‘Additional domains to sign for‘. And then change both ‘Signing of outgoing mail enabled?‘ and ‘Reject incoming email with invalid DKIM signature?‘ to yes.
Virtualmin will generate public key and add it to DNS as a TXT record. You can verify this on your DNS records.
Setup SPF and DMARC Records
SPF record specifies a list of authorized hostnames/IP addresses that mail can originate from for a given domain name. This has been already taken care of for you by Virtualmin.But DMARC needs to be configured. Go to Server Configuration > DNS Options under your domain name. Here you can configure SPF and DMARC options.
SPF options should be already setup. Just make sure IP address isn’t repeated in ‘Allowed sender IPv4 addresses‘. Then configure DMARC like this,

This basically tells receiving mail server to mark emails as spam if DKIM and SPF verifications fail.
Access Emails
You have a very high probability of avoiding spam folder when you setup everything according to above instructions. But you still don’t have a way to send and receive emails. There are two methods you can use to access your new mailbox. One is using a web-based email client and the other one is through an email client installed on your PC. You can use both methods if you want.
Configure Webmail
We’ll install RoundCube web-based email client. RoundCube is available through Virtualmin one-click script installation feature. Go to Install Scripts under your domain name and install RoundCube on a subdirectory. You can install it on the domain’s document root if you’re using this server for only emails.
You can use your domain admin’s username and password to access RoundCube. The default email address Virtualmin creates may not be the one you’re looking for. But don’t worry. You can add more email addresses and create the address you want later. I’ll get to that shortly.
Configure Local Email Client
Second method of accessing your mailbox is by installing a email client software like Thunderbird. There is something you can do to make the initial configuration easier. You can configure automatic configuration URL, so you don’t have to enter your server information manually. Go to Virtualmin > Email Settings > Mail Client Configuration and enable mail client autoconfiguration.
Then on Thunderbird, go to Options > Account Settings > Account Actions > Add Mail Account. Fill your Name, Email Address, Password and click Continue. Thunderbird should be able to detect settings automatically. Click done to start using your domain specific email address with Thunderbird.
Test Email Sender Score
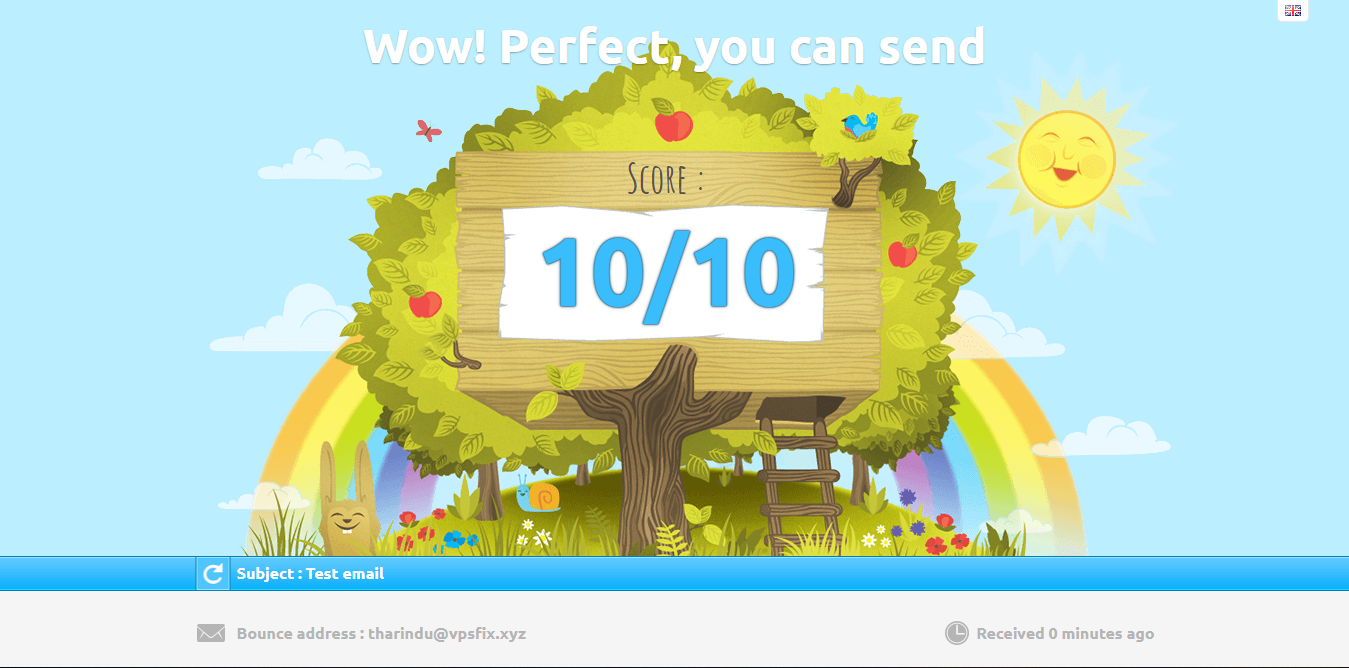 Now that everything is setup, we can test our progress. Sender score is an email reputation system. It indicates how likely your emails are to end up on receivers inbox. There are many websites that offer Sender Score checking, one of my favorites is mail-tester.com. So go ahead and check your sender score. You can see the result I got for the test mail server I setup for this tutorial in the image on right. You should also get 10/10 score for your mail server. There are no exceptions. Your email will certainly end up in spam folder if you don’t have a 10/10 score.
A 10/10 score isn’t necessarily a guarantee that emails will go to inbox. It’s an indication that you have your mail server configured properly. You need to build your reputation for better deliverability. Which has more to do with how your recipients interact with your emails. This is why you should not use this mail server for promotional mails. Not for at least for the first few months until you build a good reputation.
Add Additional Email Accounts
One of the best things about hosting your own mail server is the freedom of creating as many as email addresses you want. There really is no limitation to this. You can have whatever email address whenever you want. And it’s easy to do with Virtualmin.
Go to Edit Users under your domain name in Virtualmin. There, you’ll have an option to add a new user. Each user you add here will have their own mailbox. They can use RoundCube webmail or email clients like Thunderbird to access their mailboxes.
That concludes the instructions to configure domain specific emails with Virtualmin. Create a topic on sysadmin forum if you have issues with the installation.

Bro, how to use email with my subdomain which main domain is from cpanel.
do i need to redirect record A mail.mydomain.com to virtualmin ip address then the next step as exactly as you describe above…
thanks for your answer
Tharindu,
Great set of directions. The only thing that I don’t get is how your directions apply to a Virtualmin setup where there are 15 different Domains on one server. What or how do you set this up?
Thanks.
Hi, If I am using cloudflare for my dns, how do I set up SPF and DMARC records? I am not using BIND.