We learnt how to install Naxsi WAF on Ubuntu 20.04
Nxutil is a tool that analyzes Naxsi logs and generate whitelist rules based on them. It helps average user to reduce false-positives generated by Naxsi WAF. Let’s start by installing nxutil on our
Ubuntu 20.04
VPS.Install nxutil – Naxsi whitelist creation tool
Start by navigating to /opt directory,
cd /opt
Clone nxutil repository from Github,
git clone https://github.com/prajal/nxutil.git
Navigate to cloned directory,
cd nxutil
Install nxutil
python setup.py install
That should do it. You’re now ready to analyze Naxsi logs & create whitelist rules with nxutil tool. But before you do that, I suggest you copy existing whitelist rules for your software.
Using Naxsi Whitelist Rules Provided by the Community
These rules are created by the Naxsi community. Naxsi’s team is not involved in creating these rules. Using these rules are optional. You can ignore this section and move to creating Naxsi whitelist rules with nxutil if you like to create all whitelist rules by yourself.
For those who are still reading this section, you can find Naxsi whitelist rules for some mainstream software here. Since WordPress is the most popular software among them, I thought I’ll use it for this example.
Let’s copy WordPress rules from Github repository to a local file inside Nginx directory.
curl https://raw.githubusercontent.com/nbs-system/naxsi-rules/master/wordpress.rules > /etc/nginx/wordpress.rules
Now open nginx config file for your domain,
nano /etc/nginx/sites-available/example.com.conf
And add following line to the main location block, just below the example.com.rules line we added on my previous tutorial.
include /etc/nginx/wordpress.rules;
Your main location block for the domain should look like this,
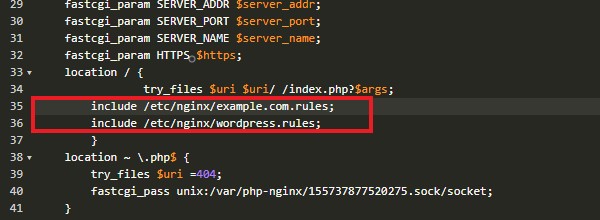
This file can be loaded for all your domains that use WordPress. If you have WordPress installed on a sub-directory, you need to add above include line to the corresponding location block. Finally restart nginx to load the changes.
service nginx restart
The rules you added above also include some whitelist rules for WordPress plugins as well. You can go through them and remove rules for plugins that you don’t use. Obviously, those rules don’t cover all WordPress plugins out there. So there’s a good change that you’ll need to write few rules for some of the plugins you use. Which brings us to the next section of this tutorial.
Create Naxsi Whitelist rules with nxutil
Before you can create whitelist rules, you need to have something recorded on your Naxsi error log. The best way to do it is to turn on the Learning Mode in Naxsi and perform some tasks on your website. Let’s enable Naxsi Learning Mode for example.com.
Open Naxsi rules file,
nano /etc/nginx/example.com.rules
Now delete the # symbol from the line that says LearningMode;. If you don’t have this symbol there, it means that the Learning Mode is already enabled for your domain. This is how file should look like. Simply put # symbol back to disable Learning Mode again.
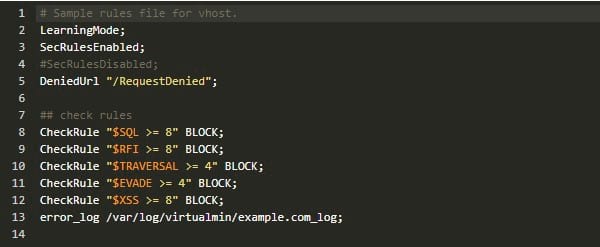
Note the last line of this file which is pointing to the Naxsi error log file of the domain. We’ll need this file when creating whitelist rules with nxutil. Load the changes by restarting Nginx,
service nginx restart
Now go ahead and perform some tasks on your website. Focus on important tasks such as password reset, user registration and shopping cart related tasks. Also if you have additional plugins, focus on them too. Test the plugin functionality thoroughly. Doing so will surely result in few entries to the Naxsi error log file. Let’s open it.
nano /var/log/virtualmin/example.com_log
The file will include lines similar to below lines,
2019/05/12 02:16:35 [error] 8400#8400: *31014 NAXSI_FMT: ip=158.69.201.47&server=example.com&uri=/community/&vers=0.56&total_processed=4153&total_blocked=526&config=block&cscore0=$XSS&score0=8&zone0=BODY|NAME&id0=1310&var_name0=wpfreg%5Buser_login%5D&zone1=BODY|NAME&id1=1311&var_name1=wpfreg%5Buser_login%5D, client: 158.69.201.47, server: example.com, request: "POST /community/?wpforo=signup HTTP/1.0", host: "example.com", referrer: "https://example.com/community/?wpforo=signup"
2019/05/12 02:24:51 [error] 8400#8400: *31082 NAXSI_FMT: ip=112.135.11.234&server=example.com&uri=/community/&vers=0.56&total_processed=4167&total_blocked=527&config=block&cscore0=$XSS&score0=8&zone0=BODY|NAME&id0=1310&var_name0=wpfreg%5Buser_login%5D&zone1=BODY|NAME&id1=1311&var_name1=wpfreg%5Buser_login%5D, client: 112.135.11.234, server: example.com, request: "POST /community/?wpforo=signup HTTP/2.0", host: "example.com", referrer: "https://example.com/community/?wpforo=signup"
2019/05/12 02:34:08 [error] 17279#17279: *1 NAXSI_FMT: ip=112.135.11.234&server=example.com&uri=/community/&vers=0.56&total_processed=4&total_blocked=1&config=learning&cscore0=$XSS&score0=40&zone0=BODY|NAME&id0=1310&var_name0=wpfreg%5Buser_email%5D&zone1=BODY|NAME&id1=1311&var_name1=wpfreg%5Buser_email%5D&zone2=BODY|NAME&id2=1310&var_name2=legal%5Bgdpr%5D&zone3=BODY|NAME&id3=1311&var_name3=legal%5Bgdpr%5D&zone4=BODY|NAME&id4=1310&var_name4=legal%5Brules%5D&zone5=BODY|NAME&id5=1311&var_name5=legal%5Brules%5D&zone6=BODY|NAME&id6=1310&var_name6=legal%5Bterms_privacy%5D&zone7=BODY|NAME&id7=1311&var_name7=legal%5Bterms_privacy%5D&zone8=BODY|NAME&id8=1310&var_name8=legal%5Bemail%5D&zone9=BODY|NAME&id9=1311&var_name9=legal%5Bemail%5D, client: 112.135.11.234, server: example.com, request: "POST /community/?wpforo=signup HTTP/2.0", host: "example.com", referrer: "https://example.com/community/?wpforo=signup"
As you can see, these lines are very informative. There’s a good description of these entries on Naxsi Wiki. But only thing we need for this tutorial is the IP address. You need to make sure you remove all errors that generated from different IP addresses than yours. It is very important to do it or you risk white-listing potentially dangerous actions. It is okay to keep errors related to other IP addresses if you know for sure that the action is a false-positive. White-listing actions recklessly puts your website at a risk.
Once you have all the false-positives you need to process, navigate to nxutil directory,
cd /opt/nxutil
And process the log file,
python nx_util.py -l /var/log/virtualmin/example.com_log -o -p 1
You’ll see an output like below,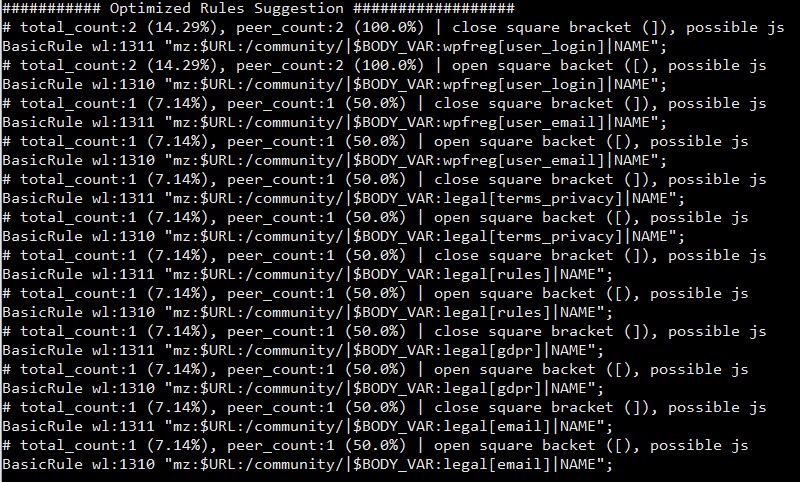
You need to copy these whitelist rules to a new file inside your nginx directory. Optionally you can remove all the lines that start with a # symbol (Number sign) as they serve as a comment. Let’s create a new file,
nano /etc/nginx/wl-example.com.rules;
Now paste all whitelist rules generated by nxutil and save the file. Next we need to include it in the nginx domain configuration file. So open it,
nano /etc/nginx/sites-available/example.com.conf
Add following line to the main location block. Preferably after the previous include line we added.
include /etc/nginx/wl-example.com.rules;
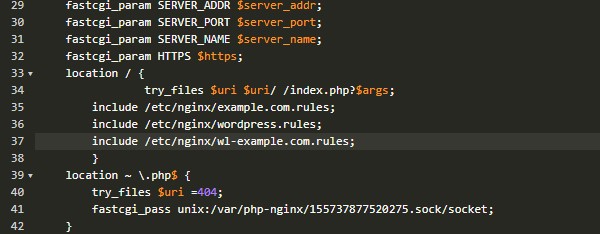
My example.com.conf file looks like this after the changes,
Restarting nginx at this point will load the new rules. You can keep testing your site and append this file with the new rules. And when you’re satisfied with the whitelist rules you generated, you need to disable Learning Mode so Naxsi can block connections. A nginx restart is mandatory each time you make changes to these files. That’s something that people forget to do all the time.
That concludes the instructions to analyze Naxsi logs & create whitelist rules. Create a topic on sysadmin forum if you have issues with the installation.