Virtualmin Post-Installation Configuration and Server Optimization Guide

A Step-by-step Guide to Optimize Virtualmin Server for Optimal Performance of your Websites

We walked you through the process of installing Virtualmin with Nginx, PHP and MySQL on Ubuntu earlier today. This is an immediate follow up to that guide which will help you Optimize Virtualmin Server for better performance and speed of your websites. 

If you’ve used our tutorial to configure your unmanaged VPS with Virtualmin and LEMP, you’re already one step ahead of others in terms of server optimization. But that’s not enough for us. We like to configure and optimize our servers to the fullest. We’ve been doing it for our clients for years. We’ll share some basic things we do to optimize our servers in this post.

This post also include some important configuration changes that you must do after setting up your server. So consider this a must follow tutorial after setting up your Virtualmin server on Ubuntu 20.04. We will begin with such important setting which will make your life easier going forward.

Set default PHP version for Virtualmin

The default PHP version configuration for Virtualmin is set to “Highest Available” by default. This is not an ideal setting for us since we’ve configured PHP v8.0 for CLI. you can change this easily from Virtualmin > System Settings > Server Templates > Default Settings > PHP Options. A drop down list of available PHP versions will be shown to you.
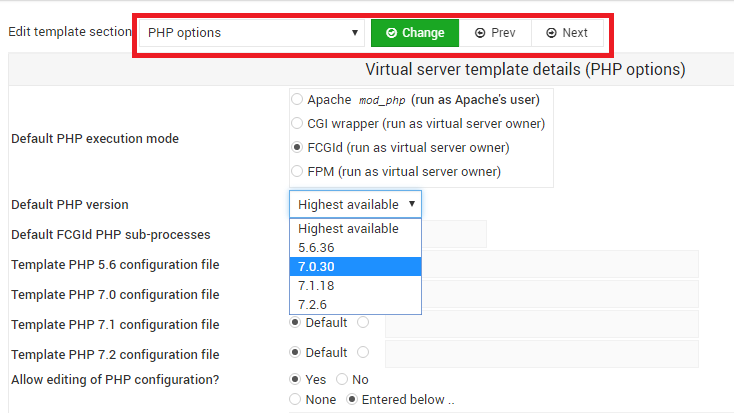
virtualmin-change-php-version

Select PHP v8.0 and click save. Now PHP v8.0 will be used for all newly created servers.

Set PHP Resource Limits

In this section, we will change few default PHP values that are too small for most websites. We will be changing 5 default values. They are memory_limit, upload_max_filesize, post_max_size, max_input_time and max_execution_time. Virtualmin gives an option to change these per website basis under PHP Configuration on Services menu for each virtual server. But having to change them for every website you add can be a little frustrating. Instead, we can change these values on main PHP v8.0 configuration file so they are copied automatically to each new virtual server you add.

Start by navigating to Webmin > Tools > PHP Configuration. You’ll see a list of configuration files for each of your PHP versions. Most of the configuration files will be for PHP CLI. But we’re after PHP FPM configuration. That’s what we should be editing.

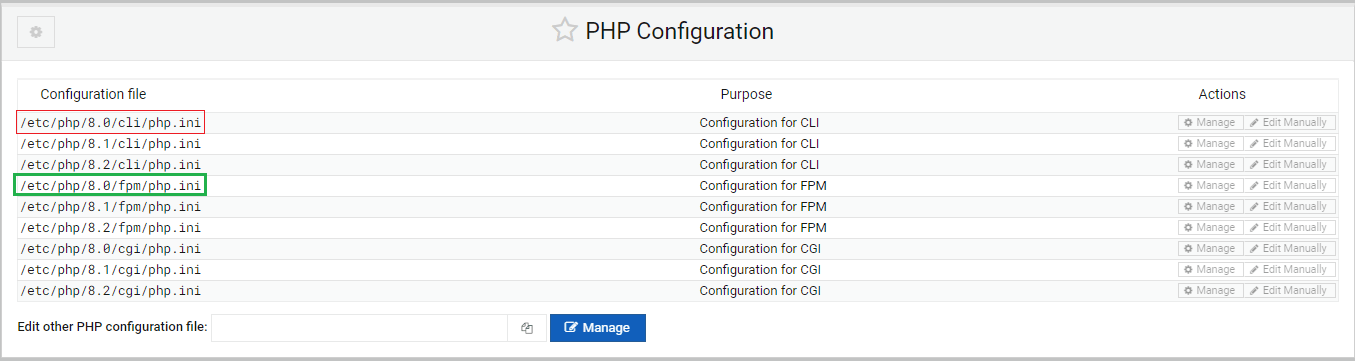
Click Manage next to PHP v8.0 CGI configuration file and then Resource Limits. If you’ve configured a different PHP version than PHP v8.0 on the previous tutorial, you should select that version here. You will see a screen similar to following with default values.

PHP Resource Limits on Virtualmin
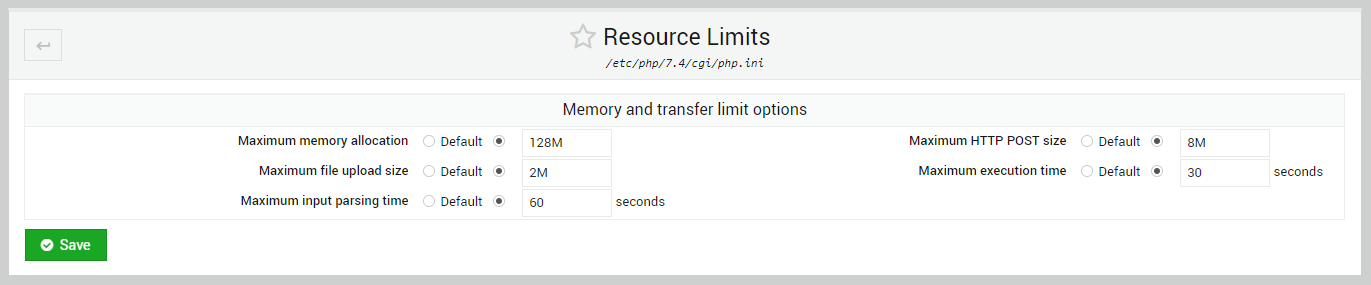
We will change these values as follows. These will be values will be good enough for most websites. If you have some requirements that need to be applied for all newly created servers, you may change them here.

Virtualmin Option Name PHP Option Name Default Value New Value
Maximum memory allocation memory_limit 128M 512M
Maximum file upload size upload_max_filesize 2M 100M
Maximum HTTP POST size post_max_size 8M 200M
Maximum input parsing time max_input_time 60 320
Maximum execution time Maximum execution time 30 120
Maximum input variables limit max_input_vars 1000 3000

Optimize Virtualmin Server with PHP OPcache

OPcache increases PHP performance by caching precompiled PHP codes. thereby removing the need for PHP to load on every hit. Virtualmin doesn’t have a feature that allows us to enable and disable PHP OPcache easily. But it’s easy enough to edit php.ini files using Virtualmin config editor. Navigate to Webmin > Tools > PHP Configuration and click Edit Manually button next to PHP v8.0.

Now hit Ctrl+F keys on your keyboard to open search box. Use it to search for following lines one by one and make the changes accordingly. Note that I’ve removed ; symbol from beginning of each of these lines which enables the setting.

opcache.enable=1
opcache.memory_consumption=128
opcache.interned_strings_buffer=8
opcache.max_accelerated_files=10000
opcache.validate_timestamps=1
opcache.revalidate_freq=10
opcache.save_comments=0

Optimize Nginx Configuration on Virtualmin Server

Next and the final step of optimize Virtualmin server tutorial is going to be optimizing nginx configuration. The default nginx configuration will have trouble handling even the basic websites. Some default values for settings like client_max_body_size is way too small for an average website. So we will be changing it and some other settings in this step. Note that these are some very basic optimizations. But they will help you avoid some mysterious looking errors in the future. Start by navigating to Webmin > Servers > Nginx Webserver > Edit Configuration Files. Make sure main nginx configuration file (nginx.conf) is selected. And make the following changes.
  • Search for the line # server_tokens off; and paste following block of codes below it in new lines.
client_body_buffer_size 10K;
client_header_buffer_size 1k;
client_max_body_size 200m;
large_client_header_buffers 2 8k;
reset_timedout_connection on;
client_body_timeout 30;
send_timeout 30;
keepalive_timeout 15;
  • Search for access_log and line and turn it off.
access_log off;
  • Search for # Gzip Settings and uncomment/change settings as below.
	##
	# Gzip Settings
	##

	gzip on;

	gzip_vary on;
	gzip_proxied any;
	gzip_comp_level 2;
	gzip_buffers 16 8k;
	gzip_http_version 1.1;
	gzip_types text/plain text/css application/json application/javascript text/xml application/xml application/xml+rss text/javascript image/x-icon;
Click Save and Close button while making sure Test new configuration before saving? is ticked. Technically and simple restart of nginx now will apply these changes to the system. But since we’ve made some changes to PHP as well, I like to do a system reboot. So let’s do it.
reboot
Changes will be applied when your VPS comes back online. Now you can move on to adding your domain to Virtualmin.

Tharindu

Hey!! I'm Tharindu. I'm from Sri Lanka. I'm a part time freelancer and this is my blog where I write about everything I think might be useful to readers. If you read a tutorial here and want to hire me, contact me here.

Related Articles

3 Comments

  1. Maybe, you can tell us, how to make best sevurity for LEMP, virtualmin and WordPress.
    Becouse i use virtualmin with apache, but sites get sometimes hacked.
    Best Regards

Leave a Reply

Your email address will not be published. Required fields are marked *

Back to top button