Instead of using a password, Amazon Web Services use a private key file to authenticate EC2 admin user to EC2 instance. This key file is created when you first create the instance. It’s impossible to access the instance without this file unless you’ve enabled password login manually on your server while you had access to it.
I don’t see a reason why you should enable password login on your server. Accessing EC2 instance using private key is more secure than using a password. So you don’t have to deal with iptables or changing SSH port. No one can get access to your server without the key. This includes you too.
But there’s a way for you to get access to all the files inside an instance without the lost key file. You need to be in control of your AWS account to do this. It’s actually very easy to do. The idea is to create an AMI of that instance and launch a new instance with a new key. This way, you won’t be losing any data and your instance will be identical to the instance with lost key file. You don’t even have to reconfigure your server. I’m going to walk you through the process in this post.
You must first login to your AWS account and select EC2. Then navigate to the region you have your instance from the upper right corner. Select the instance you’ve lost key to. Then click ‘create image’ from the ‘Actions’ dropdown.
A window named ‘Create Image’ will pop-up. Now give your image a name and click ‘create image’. You don’t have to change anything else.
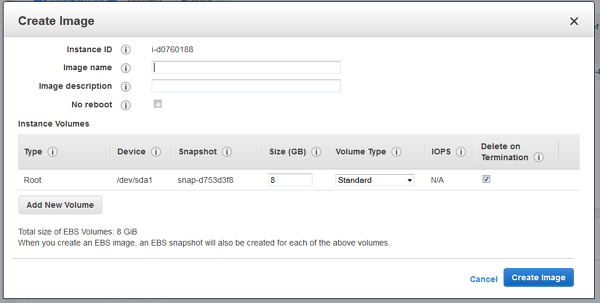
It can take a couple of minutes and your server will go down during the process. Once your AMI is available, go back to instances tab and click ‘Launch Instance’. Click ‘My AMIs’ from the page that appears next,
Select the AMI you just created and hit ‘Review and Launch’. Next you need to select a security group. Make sure that port 80 and port 22 are allowed on your security group. Click ‘Launch’ and another window will pop-up. Select ‘create a new key pair’ and give your key pair a name. Then you’ll be able to download your private key. Save it somewhere you remember and click ‘Launch Instance”. Your new instance will launch within next couple of minutes.
Once launched, you can get access to your new instance with the new key you created. Finally go to ‘Elastic IPs’ from the left sidebar and disassociate old server’s ip address. Don’t release it, that’s the ip address of your websites on that instance. All you have to do is associate that ip address to new instance, instance you have access to. That’s it. All your sites will be live from the new instance. You may now terminate the old instance. But make sure everything is functional on the new instance before you do so.

