Hostname is not much of an issue for most systems. Some VPS providers assign random names for their servers automatically. While some providers give users to choose their hostname while creating a new server. Either way, your current hostname might not be the one you prefer or what it should be. So in this post, I’m going to show you how you can Change Ubuntu Server Hostname from command-line.
There are number of friendly warning messages you could encounter on command-line when your hostname doesn’t make sense. Following are only two of them,
could not reliably determine the server’s fully qualified domain name using 127.0.0.1 for servername
[warn] RSA server certificate CommonName (CN) <fqdn> does NOT match server name!
Although it’s not a problem for most, it’s going to be a one for you if you’re trying to install Virtualmin on your server. I’m sure there are more software that need proper hostname to be setup. So let’s see how to change Ubuntu server hostname from command-line.
You can check your current hostname with following command,
hostname -f
The output should be your main domain name for server or a sub-domain of it. If it isn’t, that means your hostname is inaccurate. Run following command to open your server’s hostname file in nano text editor,
sudo nano /etc/hostname
Delete everything on that file and type your domain name or sub-domain, whichever you prefer as your hostname. Please note that you should configure your domain DNS to point to your servers IP address at this point as well. Hit Ctrl+X to save and exit nano text editor. That should be enough. Do a quick system reboot.
sudo reboot
Don’t do following unless it’s absolutely necessary!
Next you may edit server’s hosts file and add your domain name to it. So let’s open it,
sudo nano /etc/hosts
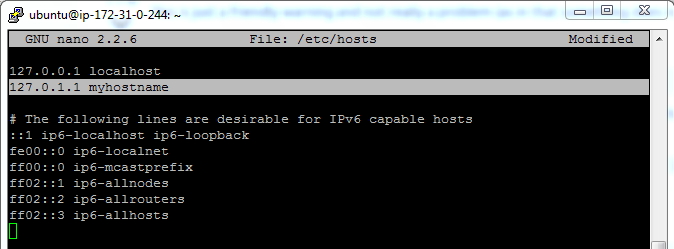
Now add following line to it. Preferably after the similar lines. Also remember to replace myhostname with your hostname.
127.0.1.1 myhostname
After editing, my hosts file looked like below. I’ve highlighted the line I just added. Save and exit the file.

Finally, you should reboot the server for changes to make effect.
sudo reboot
And that should be it. Now you’ll notice that the warning messages have disappeared. This means your server’s hostname is properly configured and you can install Virtualmin or other software you were about to install.


Is the host name is the domain name that you are pointing at?
In most cases, yes
Hi Tharindu
I have a new VPS and trying to run this command sudo nano /etc/hostname
but it is showing
sudo: nano: command not found
Try this: Fix nano: command not found
apt install nano