Sentrifugo is a feature rich human resource management system. It is a web-based self-hosted application coded in PHP. If you’re planning to use it for your business, this tutorial will help you Install Sentrifugo on VPS with Virtualmin and Nginx.
Sentrifugo Installation Guide can be confusing for some users. The installation process is similar to most php applications. You can install it on your VPS just fine if you have LAMP or LAMP setup.
Requirement to Install Sentrifugo on VPS
We’ll use LEMP for this tutorial. I’m going to assume you already have an unmanaged VPS. If you don’t, get a Ubuntu VPS from my recommended VPS providers. 1GB or more RAM is recommended. Start by configuring your VPS with Virtualmin & nginx. Then create a virtual server within Virtualmin for your Sentrifugo domain or subdomain. Once you complete those steps, you can follow below instructions to install Sentrifugo on VPS.
 Not a tech guy? Rather have a freelancer install Sentrifugo for you? Who’s better than the guy who wrote this tutorial!
Hire me and have your Sentrifugo ready within 24 hours!
Get Sentrifugo Installed
Download Sentrifugo to the Server
Virtualmin generates a new user account for each top-level server you add. You should use this account to make changes to your Sentrifugo installation. So login to your VPS with admin user account for your domain. And then navigate to public_html directory.
cd $HOME/public_html
We will use Git to download Sentrifugo installation package from official Github repository. Following commands should do it.
git init
git remote add origin https://github.com/sapplica/sentrifugo.git
git pull origin master
Above commands will avoid creating the directory sentrifugo inside public_html directory. And save package content to domain root.
Alternatively, you can also download installation package to your local machine and upload using sFTP or Virtualmin file manager.
Add nginx Rewrite Rules for Sentrifugo
Sentrifugo doesn’t need special rewrite rules. But we need to make sure requests are forwarded to index.php file. We can achieve this by adding a piece of code to nginx server block. This should be done with the root user account. So logout of Sentrifugo admin account and login to VPS with root user account. And open nginx configuration file for Sentrifugo.
nano /etc/nginx/sites-available/example.com.conf
Change example.com with your domain name or subdomain. Next search for the following line within the file (Ctrl+W).
fastcgi_param HTTPS $https;
And paste following code BELOW it.
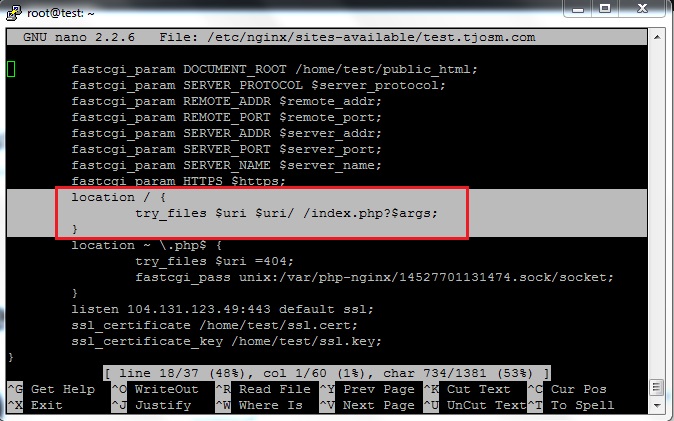
location / {
        try_files $uri $uri/ /index.php?$args;
}
File will look like this after the change,

Close the file by hitting Ctrl+X and then Y. Finally restart nginx,
service nginx restart
Install Sentrifugo on VPS
It’s time to finally install Sentrifugo on VPS. Open your domain in browser and follow the instructions. You’ll land on prerequisites section. Make sure everything is green and click Next to go to database settings.
You already have a MySQL database dedicated to your Sentrifugo. Virtualmin creates it automatically when you create a virtual server. Obtain MySQL credentials from Virtualmin and submit. Type localhost in the Host field.
Next important section in Sentrifugo web installer is Mail Server Settings. Fill the fields as below,
- Authentication: true
- Username: Domain’s admin username
- Password: Admin user password
- SMTP server: Your Sentrifugo domain name without http and trailing slashes
- Secure Transport Layer: Leave blank
- Port: 25
That’s it. Finish the installer. Your Sentrifugo credentials will be displayed on next screen. Congratulations!! You’ve successfully installed Sentrifugo on VPS with Virtualmin and Nginx. Now login to your Sentrifugo and complete the configuration wizard.


