
Mailwizz is a self-hosted Email Marketing Application (EMA). It is a popular choice among email marketers due it’s simple and efficient design. And of course the impressive feature set. If you’re thinking of using MailWizz for your email marketing campaigns, this tutorial will show you how to install MailWizz on VPS with Virtualmin and Nginx web server.
Prerequisites
Mailwizz is a premium software. Since you’re already here, I assume you’ve brought it. But if you didn’t already, go ahead and buy it from CodeCanyon. Next, you need to get Domain and hosting. You can get a new domain name from NameCheap or use a sub-domain of a domain you already own. And for hosting, we’re going to use an unmanaged VPS. Head over to my recommended VPS providers list and get a VPS with at least 2GB of RAM. Make sure the OS of your VPS is
Ubuntu 20.04
as this tutorial is only tested onUbuntu 20.04
Once you have those requirements ready, you can start the process of configuring your unmanaged VPS for hosting MailWizz. I’ve covered few of the initial steps on my previous tutorials. So please follow them in the exact order as below.
After you’ve gone through above steps, you can follow below instructions to install MailWizz on your VPS. I strongly recommend completing optional steps as well. Although they can be completed later.
Need MailWizz Installed?
Would you rather have an experienced Linux Server Administrator configure your VPS and install MailWizz for you? Get it done the right way!
- Virtualmin Control Panel
-
Nginx v1.22
Webserver -
PHP v8.0
andMySQL v8
- Free SSL for MailWizz
- And more...
Monthly VPS Management
Get a professional Linux Server Administrator maintain your VPS on daily basis for a small monthly fee. Our service include,
- Daily Malware Scanning
- Daily Off-site Backups
- Enhanced Server Security & Firewall
- Weekly Server Updates & patches
- And more...
Upload MailWizz to the Server
Start by extracting the zip file you downloaded from CodeCanyon to a local folder. And inside the extracted directory, you’ll find two sub folders called latest and update. What we want are files inside the latest directory. Everything in this folder should be uploaded to the public_html directory on the virtual server you created for your domain. You can use FileZilla to upload files to your server. Make sure to use the administrative username for the domain when connecting with FileZilla.
Add nginx Rewrite Rules for MailWizz
The web server software we’re using with this setup, Nginx, is extremely fast and lightweight. Using a software like this help get most out of the already cheap unmanaged VPS we’re using. But MailWizz doesn’t work out of the box with Nginx. We have to make a small change to nginx configuration to make them understand each other.
The change we’re going to make is to add nginx rewrite rules for MailWizz. These rules need be added to nginx server block for your MailWizz domain. Following command will open the file containing the server block for you. But make sure you change example.com with your domain or sub-domain.
nano /etc/nginx/sites-available/example.com.conf
Search for following line within the file,
fastcgi_param HTTPS $https;
And paste following nginx rewrite rules below it in a new line.
     location / {
         if (!-e $request_filename){
         rewrite ^(/)?api/.*$ /api/index.php;
         }
         if (!-e $request_filename){
         rewrite ^(/)?customer/.*$ /customer/index.php;
         }
         if (!-e $request_filename){
         rewrite ^(/)?backend/.*$ /backend/index.php;
         }
         if (!-e $request_filename){
         rewrite ^(.*)$ /index.php;
         }
         index  index.html index.htm index.php;
     }
Close the file and restart nginx.
systemctl restart nginx.service
Install MailWIzz onUbuntu 20.04
VPS
If you have followed above instructions successfully, your MailWizz is ready to be installed. Now point your browser to the install directory to begin the process.
https://example.com/install/index.php
You will see a page like this,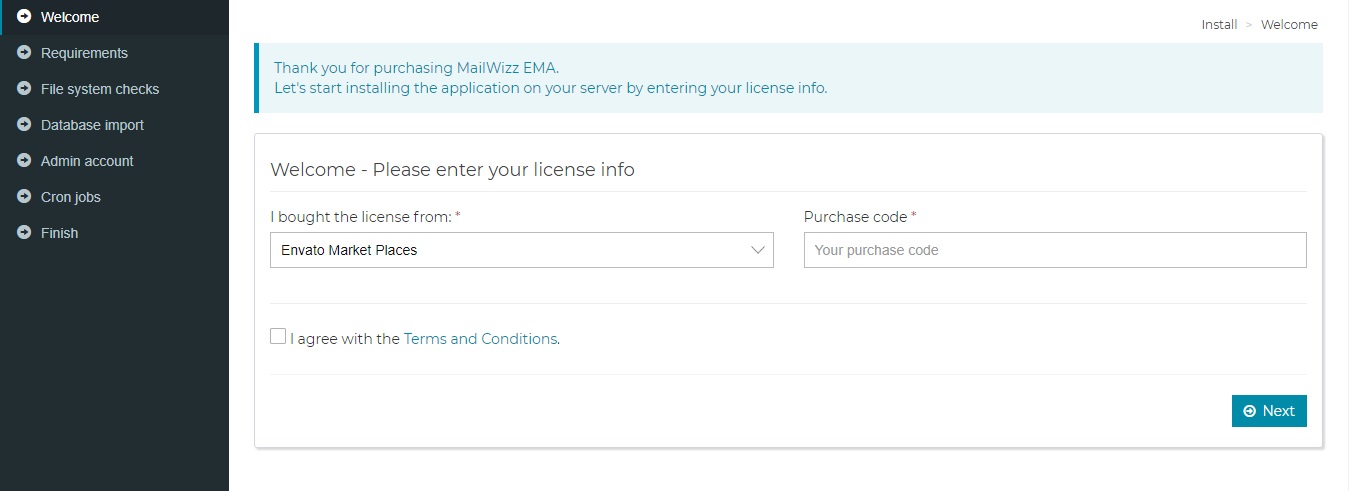
Installation wizard will guide you through the initial setups of your MailWizz installation. You’ll be asked for MySQL credentials to use with MailWizz in the fourth step. A new database for your domain was created automatically when added your domain to Virtualmin as a virtual server. I covered this part in a previous tutorial and asked you to complete it in the prerequisites. So you should be able to obtain MySQL credentials Virtualmin without much trouble. Fill in MySQL credentials and go through with the installation. The MySQL port should be 3306.
Setup MailWizz Cron Jobs
The next technical step during the installation wizard is creating MailWizz cronjobs. The Wizard will display cronjobs that need to be added on your screen alone with instructions. But I suggest using following cronjobs to be fully compatible with Virtualmin and our server setup. These rule are identical what MailWizz suggest during the installation wizard. But I’ve changed the way PHP is called. Either way, let’s open the crontab with following command. Remeber to login to your VPS as domains’s administrative user for this part.
crontab -e
Since you’re opening crontab for the first time, you will be asked to select an editor. Select nano text editor as it’s the easiest to use from the bunch. Crontab will open and you’ll see few Virtualmin related cronjobs. Add following commands at the end of the file.
* * * * * php -q /home/AdminUser/public_html/apps/console/console.php send-campaigns >/dev/null 2>&1
* * * * * php -q /home/AdminUser/public_html/apps/console/console.php queue >/dev/null 2>&1
*/2 * * * * php -q /home/AdminUser/public_html/apps/console/console.php send-transactional-emails >/dev/null 2>&1
*/10 * * * * php -q /home/AdminUser/public_html/apps/console/console.php bounce-handler >/dev/null 2>&1
*/20 * * * * php -q /home/AdminUser/public_html/apps/console/console.php feedback-loop-handler >/dev/null 2>&1
*/3 * * * * php -q /home/AdminUser/public_html/apps/console/console.php process-delivery-and-bounce-log >/dev/null 2>&1
0 * * * * php -q /home/AdminUser/public_html/apps/console/console.php hourly >/dev/null 2>&1
0 0 * * * php -q /home/AdminUser/public_html/apps/console/console.php daily >/dev/null 2>&1
*/5 * * * * php -q /home/AdminUser/public_html/apps/console/console.php list-import folder >/dev/null 2>&1
*/5 * * * * php -q /home/AdminUser/public_html/apps/console/console.php email-blacklist-import folder >/dev/null 2>&1
Change AdminUser with your domains administrative username in above cronjobs. Save and close the file.
Final step is to delete the install directory from the server. Following command will take care of it.
rm -rf /home/AdminUser/public_html/install
MailWizz install on VPS is now complete. You’ll be able to login to backend of the MailWizz EMA with the username and password you setup during the installation wizard.
If you have issues with these instructions or the installation create a topic on server administration forum.


bro i need some help. sometimes when i send mail from mailwizz through virtualmin , mails deliver successfully but received very late approx 6 hours or sometimes 2-3 days. what should i do?
I don’t think I understand your problem. Can you open a topic on the forum with more details?