Compute Engine is part of Google Cloud Platform. It allows users to launch high performance virtual machines. These VM instances can be used host website when properly configured with web server software. I’m going to show you how to launch Google Compute Engine VM instance to host websites with Virtualmin in this post.
We’ll be launching an
Ubuntu 20.04
VM instance in Google Compute Engine. There are few things like firewall and SSH keys we need to configure in order to make sure Virtualmin can function properly on Google Compute Engine. We’re basically preparing VM Instance for Virtualmin in this post.Configure VPC Network Firewall for Virtualmin
We’ll configure firewall rules in VPC Network to allow connections on essential ports we’re going to use. To be exact, we’ll allow connections on Ports 22, 80, 443 and 10000. An explanation of what these ports are for and what other ports you might need to enable can be found on ports need to be opened for Virtualmin in firewall forum topic.
 Navigare to Networking > VPC network > Firewall rules from your GCP console. You’ll see a list of predefined firewall rules. We’ll create a new rule set for our web server and Virtualmin. Click CREATE FIREWALL RULE. We’ll call this new rule set virtualmin-firewall-rules.
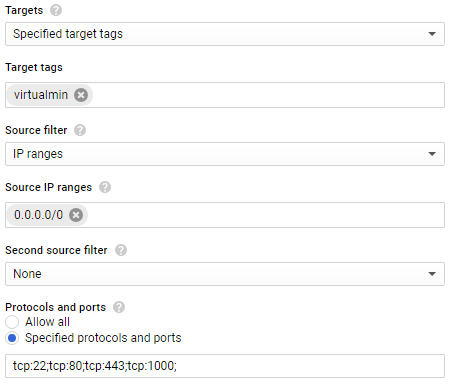
Leave other settings as default and scroll down to the section that says Target tags. Type virtualmin in the text field below it.
Next, go to Source IP ranges and type 0.0.0.0/0 in the text field below it.
Finally under Protocols and ports, make sure Specified protocols and ports option is selected and type following in the text field.
tcp:22; tcp:80; tcp:443; tcp:10000;
You can add your own rules here. For an example, if you want to open port 25, you need to add tcp:25; to the end. Click Create when you’re done adding your rules.
Launch Google Compute Engine VM Instance
We’ll now move to creating the VM instance. Navigate to Compute > Compute Engine > VM instances. And click Create button. There are few configurations to be done. We will leave most of them as default. But you should give your instance a name and select a suitable machine type. 1vCPU (n1-standard-1) is a good starting point. I wouldn’t recommend micro or small instances. They have very limited CPU allocations.
Next change the boot device to
Ubuntu 20.04
. It’s the latest version of Ubuntu currently supported by Virtualmin. I’ll update Virtualmin setup tutorial when later versions of Ubuntu is being supported. Make sure to read that tutorial and select the latest supported version accordingly. Set the Boot disk type to SSD persistent disk. It costs a bit more, but has better performance.Next we’re moving to firewall section. We don’t need predefined firewall rules since we already created our set of firewall rules. Click on Management, security, disks, networking, sole tenancy link under the firewall section. Enable deletion protection on the Management tab.
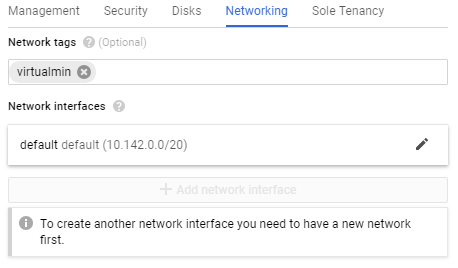 And then switch to Networking tab. Type virtualmin under the Network tags. This is the target tag we set on firewall rules. Leave the rest as default and click Create button.
It’ll take few moments for instance to be created. We have one more thing to take care of. The IP address originally assigned to VM instance is dynamic. We don’t need that. So let’s assign a static IP address.
Assign a static IP address to Google Compute Engine VM Instance
Navigate to Networking > VPC network > External IP addresses. You’ll see your VM instance IP address already listed there. Click on Ephemeral and select Static.

You’ll now have a static IP address assigned to your VM instance. This IP address will be reserved for your account even if you delete the VM instance. Unlike dynamic IP addresses that get released to to IP pool upon instance deletion.
If you followed above instructions to launch Google Compute Engine VM instance, your VM instance is now ready for Virtualmin. You can login with SSH option available at GCP console or use SSH key file with PuTTY if you have set it up.