Joomla is probably the best free content management system (CMS) software available on the planet. It’s doesn’t matter if you want to create a business website or a personal blog, you can use Joomla to create any kind of website you want.
Joomla may not easy as WordPress when it comes to blogging. And it’s not genuine blogging software. WordPress is. But with few simple extensions, it offers anything that WordPress can offer. Because of being a CMS, it can offer even more.
Installing Joomla
Installing Joomla is not a hard work. It’s just a matter of few minute and all done. Even if it’s a simple process, you can be confused if you try to follow official guide found on Joomla website. But I have to mention that’s the right way to do it. But that’s lot of reading. I’m here to help you out with quick installation guide.
Auto Install with cPanel (Joomla 1.5)
It can’t get easier than this. If your host offers cPanel, you can set up Joomla on your hosting with no time. Just login to your cPanel and scroll down to Software/Services section. Then click ‘Fantastico De Luxe ‘. Click Joomla 1.5 on the left sidebar and follow onscreen instructions to install. But unfortunately, Fantastico doesn’t offer latest version of Joomla at the moment of writing. If you need latest version do not install 1.5, there’s no auto upgrade option available with Joomla. Only solution is to install it manually. And trust me, it’s not that hard.
Manual Install
Go to Joomla official website and download the latest stable version of Joomla (2.5 as of 07th June 2012). Extract downloaded file to a local folder. Now connect to your hosting account using FTP client and upload extracted files where you need Joomla to be installed. Uploading may take several minutes depending on your internet connection speed.
Create MySQL Databases
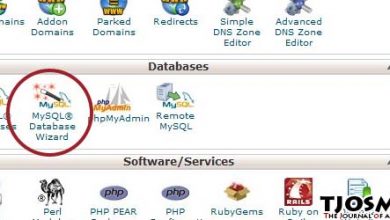
In the meantime let’s create MySQL database and user for Joomla installation. Go to your cPanel and scroll down to ‘Databases’ section. Click “‘MySQL Database Wizard’ under Databases and follow onscreen instructions to create database, database user and assign all privileges to the user.
Once uploading is completed, open your domain in the browser. It’ll redirect you to Joomla installation screen. There will be seven steps in the installation process.
- Step 01: Choose language – Select preferred language from the list and click next
- Step 02: Pre-Installation check – The installer will check your server capability with Joomla
- Step 03: License – This step will display license info
- Step 04: Database Configuration – Fill the form with MySQL database information just created. Make sure ‘Database Type’ is set to MySQL before clicking next
- Step 05: FTP Configuration: This step is optional, simply click next and continue to next step
- Step 06: Main Configuration: Type your site’s name and pick a username and click next. You can install sample data if you want. It’s fill you site with few sample articles and categories. You can remove it later.
- Step 07: Finish – Joomla installation is now finished. You need to delete installation folder to use Joomla. Click ‘Delete Installation Folder’ and that’s it.
Now you can log in to administrative area with your username.