StartSSL is a popular certificate authority (CA). They are among the very few certificate authorities that offer SSL certificates for free. Their level one certificate is 100% free and valid for a whole year. Best thing is that it’s renewable free of charge there after.
So if you have a website that offers information for free, which means it doesn’t ask visitors to sign up and enter personal/payment information, you can use StartSSL free SSL certificate to secure connections from your server to end-user. This is a very basic certificate and if your website needs visitors to create accounts for any reason, you should consider going for a paid certificate to gain visitor trust.
Going for a paid certificate is a waste of money for most websites. Because all signed certificate does is verify ownership of a website. Certificate Authorities do it in many levels. Higher the level, higher the cost. StartSSL’s free certificate in other hand only verifies the domain ownership by email. You’ll have to verify an email address associated to your domain name and that’s it. You’ll get a SSL certificate in minutes with absolutely no paper work.
So let’s see how you can get this free certificate for your domain. First head over to StartSSL and sign-up for an account. After you’ve done that with confirming your email address, you can login to StartSSL with given certificate. Now that you’ve an email verified account, you can generate level one certificate for your domain.
Login to StartSSL, go to Validations wizard and choose domain verification from the drop down menu; then click continue.

On next page, enter your domain name without www or any other sub-domain. Click continue again. Now you’ll be presented with a list of email addresses associated with your domain name. You’ll have to verify an email address from that list to move forward. So pick an email address you have access to and click continue.
A verification email will be sent to your inbox. Copy-paste the verification code from email to Validations wizard to finish the verification. Next you should move to the Certificates wizard tab. Select Web Server SSL/TSL Certificate from the drop down menu and click continue,

You need to skip next step since you’ve already created a private key and CSR in Install StartSSL Certificate on Nginx tutorial. If you haven’t, you should do it now. Things will be lot easier for you if you’ve configured your server with my tutorials. If you’re on different configuration, I suggest you move to DigitalOcean VPS and start building your server with my tutorials. I’ve pretty much everything covered in here.
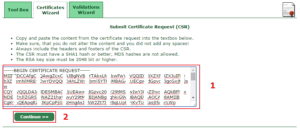
Moving on, skipping that step will take you to a page where you’ll be asked to submit content of your CSR file. This file is currently on your server and you can open it by running following command; of course you have to be logged in to your server to do that,
sudo nano temp/example.csr
Highlight everything on that file using your mouse and hit Ctrl+C to copy content to your clipboard. Then paste everything to text box on StartSSL Certificate wizard page; And then click continue.
You’ll see a confirmation of your Certificate Request on next page. You can move forward by clicking continue. Select you domain from the drop down menu on next page and click continue again. You’ll be asked to add a sub domain in next page,

I’ve added ssl, you can have whatever you want. You can finish Certificates wizard by submitting your order for processing on next page. It can take few minutes to process your order. You’ll be given with three files upon process completion. Save those files in somewhere you can remember as you’ll need them in few minutes. your Free StartSSL SSL certificate is now successfully created. Now you can pickup from where you’ve left on StartSSL Certificate on Nginx tutorial.

