
Cloudflare recently announced SSL for their free plan. It’s a free service and it’s called Universal SSL. With Universal SSL, all websites on cloudflare free plan gets a signed SSL certificate. Having SSL certificate has lots of advantages. It’s best described in CloudFlare one-click SSL. I won’t be talking about them on this post. I’m here to help you grab those advantages.
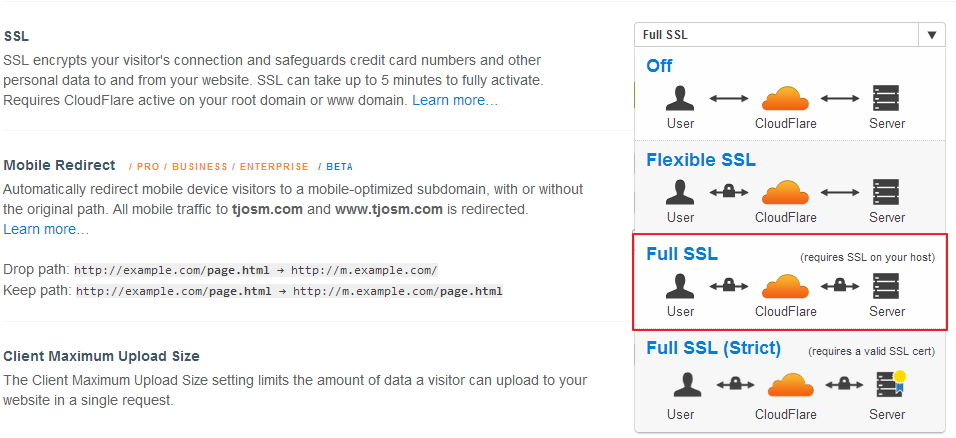
Yes, I’m here to write a step-by-step tutorial on how you can apply Cloudflare Universal SSL on your Nginx server and secure connections to your WordPress blog for free. Cloudflare Universal SSL has three options. They are Flexible SSL, Full SSL and Full SSL (Restrict). Flexible SSL don’t need any configurations on your server. It’ll work out of the box. But it’s the least secure option. Full SSL (Restrict) requires a signed SSL certificate installed on your server. Singed certificate will cost you $50+ a year. So it’s expensive. Full SSL in other hand only need an self-signed SSL certificate installed on your server. You can generate it within your server without any cost. it’s almost secure as any other signed certificate. But due to it not being signed by a certificate authority, browsers will throw very scary warnings for visitors.
Those warnings kept webmasters from securing their websites for years. But with Cloudflare, we have the opportunity to secure our websites for good. You’ll be using an self-signed certificate on your server with Cloudflare Full SSL option. Since your server will be behind the Cloudflare cloud, browsers won’t see your self-signed certificate. Instead they’ll see a signed certificate from Cloudflare. This way, connections from your server to Cloudflare will be secure with an self-signed certificate and connections from Cloudflare to end-user will be secure with a signed certificate. No more browser warnings and completely secure connection as a result.
Let’s begin by pausing Cloudflare for the domain you’re installing SSL for. It’s necessary to do this now to confirm you’ve installed self-signed certificate on your server. Then delete your browser cache. Next step is to install an self-signed certificate on your server. I have a separate tutorial with copy-paste instructions. So follow it and install an self-signed SSL certificate on your Nginx server.
After you did that, you can confirm if SSL is successfully installed on your server by visiting your website with https instead of http. You should see a warning with “This Connection is Untrusted” or similar meaning. If you see that, you’ve configured SSL on your server successfully.
Configure WordPress for SSL/https Connections
Enabling SSL for WordPress is as easy as adding few lines of code to wp-config.php. So let’s open it with nano text editor,
sudo nano /var/www/example.com/htdocs/wp-config.php
And add following code to the file,
define('FORCE_SSL_ADMIN', true);
if ($_SERVER['HTTP_X_FORWARDED_PROTO'] == 'https')
       $_SERVER['HTTPS']='on';
Save and close the file. Now go to Settings > General on your WordPress dashboard and add https:// to both WordPress Address (URL) and Site Address (URL). Your site should now be using SSL connection.

Configure Cloudflare to use Full SSL
Now it’s time to enable Cloudflare for your domain again. But before that, you have one more thing to do. You should set SSL to Full SSL from your Cloudflare settings. So Go to Cloudflare settings for the domain and scroll down to SSL. Select Full SSL from the menu.
Doing so will make that ugly unsecure connection icon next to your domain name disappear from your browser. You might have to clear your browser cache again.
Redirecting http to https on Nginx
Since you have https enabled on for your website, you should redirect all http traffic to https. Setting up 301 redirect from http to https is the best method. It’ll also let search engines like Google know that you’ve moved to https protocol permanently. You can do it by adding a new server block to your domain’s Nginx virtual host file. So let’s do it too,
nano /etc/nginx/sites-available/example.com
Add following code to the very beginning of that file,
server {
        server_name example.com;
        rewrite ^/(.*) https://example.com/$1 permanent;
        }
Restart Nginx,
service nginx restart
You can check if it’s working by going to an http url of your site. It should be automatically redirected to https version. If all goes well, now you have a secure website with a green locked padlock next to its address in the browser.


Hello Thaindu..Can you please contact me ? I really need some help from u. thanks
Check your inbox
Thanks, man! I’ll be using your instruction on a site I’m looking to setup
another great tutorial from you
i have successfully installed ssl on my site
thanks Tharindu
maybe sometimes, post somethings about internet marketing
🙂
The little section regarding adding the IF statement below the Force_SSL has finally fixed my problem. Everything was working besides the Admin section but now it works again. Your tutorial should really be linked on CloudFlare for people with NGINX. Thanks a ton!
Very useful tutorial. Thank you!
You could redirect to https using cloudflare rules https://support.cloudflare.com/hc/en-us/articles/200170536-How-do-I-redirect-all-visitors-to-HTTPS-SSL-
Thanks man, it works perfectly! and this is much better than fixable SSL.
However, there is something could be missing .. My theme (any many others) create a dynamic css to upload folder which you have to handle too .. i just needed to add a new function:
function fix_ssl_upload_url( $url ) {
if ( is_ssl() )
$url = str_replace( ‘http://’, ‘https://’, $url );
return $url;
}
add_filter( ‘upload_dir’, ‘fix_ssl_upload_url’ );
Add this to your theme functions.php, it will fix mixed content / css block