
I’ve discussed about importance of hosting affiliate landing pages on a CDN network instead of shared hosting or VPS to improve PageSpeed on my previous post. I’ll be guiding you through the steps of hosting your HTML landing pages on KeyCDN in this tutorial.
I’m using KeyCDN to cache and deliver static content on this website at the moment of writing. I’m really happy with the results. My average PageSpeed dropped to 4 seconds from 6 seconds, which is acceptable for me considering the number of plugins I’m using and how heavy my theme is. The PageSpeed will be lot better for you since you’re using HTML pages. I’m going to assume that you already have a landing page and a domain name. sign-up for an account at KeyCDN. Use following link to get $10 free credit.
Sign-up for KeyCDN
Create a Push Zone
Go to Zones tab from the KeyCDN dashboard and click Add Zone to create your first zone. Give your zone a name and leave Zone Status as active. Select Zone Type as Push and check the Show Advanced Features check box.
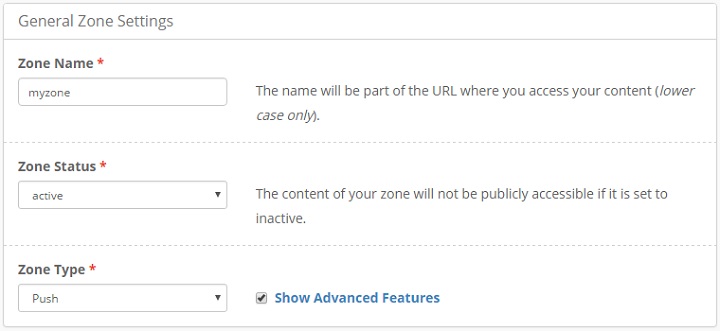
Checking advanced features check box will give more configuration option for your zone. A description about the each configuration option is available on the page itself. Feel free to configure your zone as you wish. Following are my configurations.
- Force Download: Disabled
- CORS: Disabled
- GZip: Enabled
- Expire (in minutes): 43200
- Block Bad Bots: Enabled
- A/ E Referrer: Disabled
- Secure Token: Disabled
- HTTP/2: Enabled
- SSL: letsencript
- Force SSL: Enabled
- Directory Listing: Disabled
- Directory Index: Enabled
Click Save and your zone will be deployed within few minutes. Next you need to assign your domain name to the zone you just created.
Create a ZoneAlias
Pointing your domain to CDN zone is a two-part process. First, you must create a ZoneAlias within KeyCDN dashboard. Secondly, you must add a CNAME record pointing to your Zone URL from to your domain DNS manager.
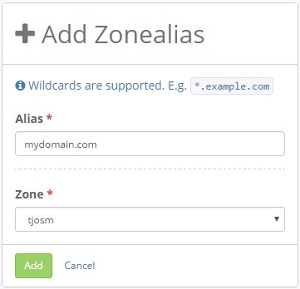 So let’s create the ZoneAlias first. Navigate to Zonealiases from the KeyCDN dashboard and click New ZoneAlias. Type your domain name in the Alias field without http or https. If you’re using a sub domain for your landing pages you should type it here.
Select the zone you created in previous step from the drop-down menu and click Save. KeyCDN is now configured to host your domain on its network. But your domain is not pointing to your KeyCDN zone until you add a CNAME to your domain. You can do this by going to your domain DNS manager. The way of adding a CNAME record to a domain change from registrar to registrar. You must refer to your domain registrar’s knowledge base if you’re not sure how to do this. You should point your domain name to the Zone URL which you can find by going to Zones tab again.
Upload a Landing Page
Now that your CDN zone is fully configured, you can use a FTP client like FileZilla to transfer your landing page to the CDN zone. If you are familiar with shared hosting, this process is no different from using FTP to upload files to your shared hosting account. If you haven’t used FTP before, you need to download and Install FileZilla on your computer first. Then open application by double clicking on FileZilla icon on desktop. You will see 4 empty fields that are asking for following information.
- Host – ftp.keycdn.com
- Username – Same username as for the dashboard
- Password – Same password as for the dashboard
- Port – 21
You’ll see a folder with the same name as your zone name once successfully connected. Files you upload to this folder will be publicly available from the your domain. You can create new folders inside your main folder to host multiple landing pages.
hey, very interesting but one question : what difference between puh and pull zone ? A very few informations about that on the web. (I want my files stay on my web)
thanks for your answer
soj
You need to upload your files to a push zone. A pull zone CDN pulls files directly from your server. So if you need to keep files on your server, you need to create a pull zone.
please make a video on pull zone and how to verify that site is using keycdn or not?