
CPV Lab is a self-hosted tracking software that you can use to track your affiliate campaigns. It is a premium tracking software with lots of great features. I’m going to show you how to install CPVLab Pro on VPS with Virtualmin as control panel and Nginx as the web server.
I’m using Nginx as the web server because it’s lightweight and fast. And when configured on an unmanaged VPS, hosting is so much cheaper and faster than expensive managed VPS or slow shared hosting solutions. If you don’t have an unmanaged VPS yet, you can get one from my recommended unmanaged VPS providers. I suggest you going with at least 2GB of RAM.
Make a good use of the button below. It’s free!
Get CPVLab Pro Installed
Before you can install CPV Lab Pro on your VPS, you need to configure it with Virtualmin and Nginx. And then create a virtual server with Virtualmin to host your domain. Since neither CPVLab nor CPVLab Pro support PHP7 yet, you need to install PHP 5.6 for CPVLab domain following my how to use multiple PHP versions With Virtualmin and Nginx tutorial. Finally install ionCube loaders as it’s a CPVLab requirement. I’m going assume that you did all that before you proceed with this tutorial. If you missed any of those, this installation is going to fail. And once you go through those three tutorials, installing CPVLab is easy. So let’s do it.
Prepare to install CPVLab Pro on VPS
You can start by extracting CPVLab files you downloaded to a local folder. Files inside V3-Install-Package folder needs to be uploaded to public_html on your server. You can use FileZilla to upload files to your VPS. Instead of using root account, use the username and password of the virtual server you created earlier. Open public_html folder and upload everything inside V3-Install-Package.
Now adjust permissions of few files as per CPVLab requirements. Connect to your server as root over SSH and run following commands with AdminUserName replaced with your domain’s admin username.
chmod -R 777 /home/AdminUserName/public_html/smarty/templates_c
chmod -R 777 /home/AdminUserName/public_html/phpbrowscap/BrowserCache
chmod -R 777 /home/AdminUserName/public_html/WURFLres
chmod -R 777 /home/AdminUserName/public_html/WURFLres/storage/cache
chmod -R 777 /home/AdminUserName/public_html/WURFLres/storage/persistence
chmod 666 /home/AdminUserName/public_html/lib/db_params.php
chmod 666 /home/AdminUserName/public_html/license/license.php
Run CPVLab Web Installer
CPVLab installation is almost complete. Point your browser to CPVLab web installer. If you’ve uploaded files to public_html folder, open following URL on the browser.
http://example.com/install.php
You’ll see a page like below,
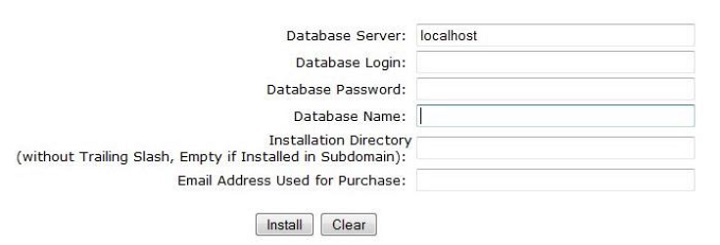
Fill in the fields like below,
- Database server: localhost
- Database login: Administrative username
- Database password: MySQL Password of administrative user*
- Database name: Administrative username
- Install directory: leave it empty
- Email address used for purchase: self explanatory
Click install and you’ll be redirected to the login page after few seconds. But before you login. you need to remove install script from server and reverse few file permissions you changed earlier.
Complete the Installation
Login to VPS as root again and run following command to delete install script.
rm /home/AdminUserName/public_html/install.php
Then change file permissions.
chmod 644 /home/AdminUserName/public_html/lib/db_params.php
chmod 644 /home/AdminUserName/public_html/license/license.php
You can now access your CPVLab.


Great man. I followed all your tutorials and now I have a VPS with CPV lab installed. Thanks a lot for the info!