
One of the most well-known WordPress errors that users face is “Failed to Write File to Disk Error” when you try to upload a file from the WordPress admin area. If you are trying to fix that error, you can easily restore it. This article will describe how to fix the “Upload: failed to write file to disk” error in WordPress. Some WordPress forum users have reported an issue when trying to upload images, videos, or other media to the website. The error occurs, “Failed to write file to disk.”
What Causes the “Failed to Write” Error?
Incorrect folder permissions can cause the failure to write to disk. As a result, WordPress pretends that files cannot be written to the directory. This can also be caused by the quota limit of your hosting account is reached, installing harmful third-party plugins, or a primary change on your web hosting, folder/ file permission is incorrect, or the temporary folder is full. Some attacks from hackers may also change folder permissions, which gives them the right access to install files of their own. This is usually when a script overwrites those permissions and places a “phishing” fake website within your web server. In any case, here are the actions to fix the “failed to write file to disk” problem and restore your website.
First, you need to log into your web server using an FTP client. You can use the FileZilla FTP client to do this easily. To build a connection using FileZilla FTP, you need to get the following information:
- FTP Host/Address: (Your website IP address or server hostname)
- FTP Username: (Your cPanel or FTP username)
- FTP Password: (Your cPanel or FTP login password)
- Port: 21, or you can leave it blank
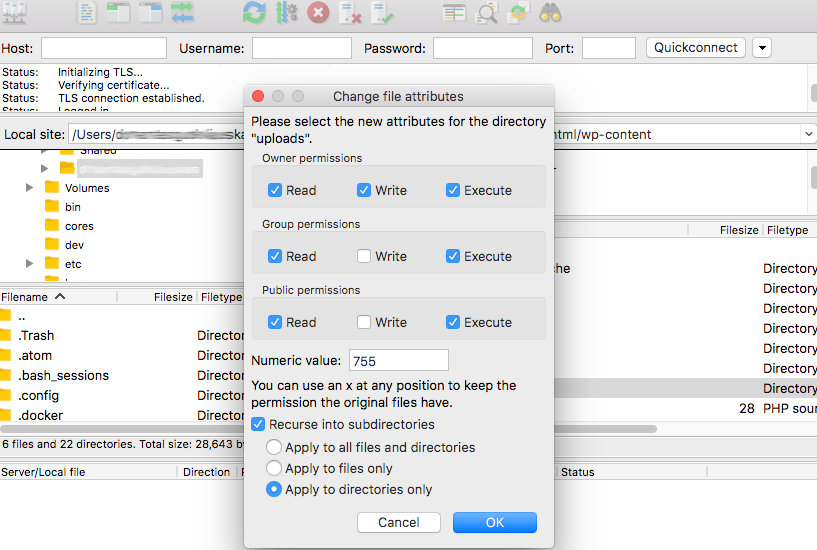
Then you need to go into the directory and change the file permissions. You can access them right on the disk. What that means is that you will get permission so that you can upload your images/ videos or any other media files. So because your images and all media files are in the content folder, Go to wp-content, and now you will able to find the very bottom where it says file permissions. Again, your FTP client might be different.
After that, you need to open the file permissions. You will then enter the value of 755 and check the boxes that say “Recurse into subdirectories,” and then the “Apply to directories only” option. Then save it.
Now you need to go back and again and enter the number 644. Again, you need to make sure it is the “Recurse into subdirectories” and the “Apply to files only” option. Then click ‘OK,’ and now your FTP client has set the file’s permission as 644 with all the files inside the wp-content folder. After doing these steps, log in to your WordPress website, upload your image or do anything you were doing before, and the error should be fixed.