You’re in the process of enabling SSL (https) on your Virtualmin-Nginx server and your website is available through both https and http. The next thing you must do is redirect http to https so the duplicate content issues are avoided. This post will show you how to setup 301 redirect from http to https on Nginx using Virtualmin.
Enable SSL on Virtualmin - Series Breakdown
This is the last part of my three part tutorial series Enable SSL on Virtualmin Nginx Server. Although your server is properly configured to serve content over SSL, it’s important that you setup 301 redirects. Nginx configurations on this page will redirect your entire website to https.
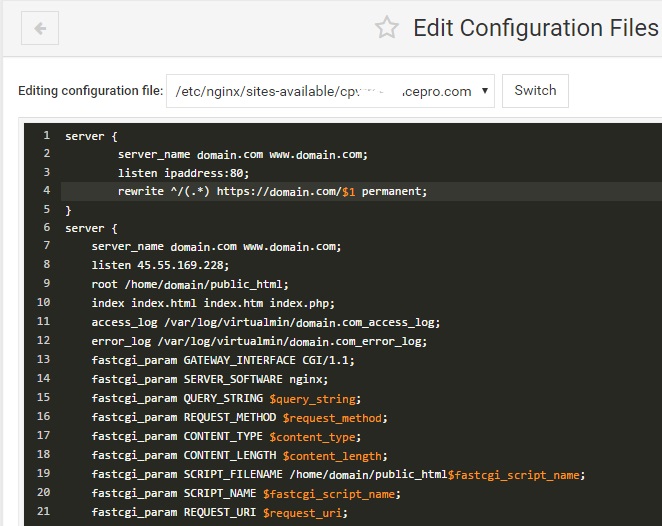
Start by login in to Virtualmin as root user and navigating to Webmin section. Then go to Servers > Nginx Webserver and click Edit Configuration Files. Select configuration file for your website on the configuration file drop-down menu. It’ll look like this,
/etc/nginx/sites-available/domain.com.conf
Now add following code to beginning of the file,
server {
        server_name domain.com www.domain.com;
        listen ipaddress:80;
        rewrite ^/(.*) https://domain.com/$1 permanent;
}
Remember to change ipaddress and domain.com with your server’s real IP address and domain name. The result will look like this,

Save Configuration file and go back to Nginx Webserver. Scroll down and click Apply Nginx Configuration. All non http pages on your website should be redirecting to https now. You can verify this by opening http version of your domain on the browser.
Server-side configuration is now completed. But there might still be some errors, such as mixed content warnings. These are related to the software (CMS or HTML pages) you’re running on your website. Most software will support SSL out of the box. But some CMS like WordPress needs additional configurations.
