
Invoice Ninja is a software built with PHP Laravel framework. It allows business owners to manage invoices and expenses with ease. Invoice Ninja has both hosted and self-hosted versions of its software. The self-hosted version is open source. This tutorial will guide you through installation of Invoice Ninja on
Ubuntu 20.04
VPS with Virtualmin & Nginx.Invoice Ninja isn’t limited to just invoicing & time-tracking. It packs powerful features like recurring invoices, auto-billing clients, proposals creation, client-side portal, invoices history and much more. Refer to the Invoice Ninja website for full list of features.
By following this Invoice Ninja installation guide, you’ll build your web server with
Virtualmin v7.1 GPL
,Nginx v1.22
,PHP v8.0
andMySQL v8
. This guide will always install latest version of Invoice Ninja on your VPS. So let’s get right into it.Prerequisites
You’ll need a VPS with at least 1GB of RAM. You can get one from my recommended VPS providers. This tutorial is only tested on
Ubuntu 20.04
. But might work on other versions of Ubuntu and Debian. After getting a VPS, you need to complete following steps,Optional steps can be ignored. But I highly recommend completing them as they are essential to any web application. Once you complete those steps, you can follow below instructions to Install Invoice Ninja on
Ubuntu 20.04
VPS.Hire me and have your Invoice Ninja ready within 24 hours!
Get Invoice Ninja Installed
Prepare VPS for Invoice Ninja
Your server should be capable of hosting most PHP applications at this point. But Invoice Ninja has special requirements. It needs PHP’s gmp extension enabled on the server. The Virtualmin installation tutorial doesn’t cover this requirement. Let’s fix that. Execute following command as root user.
apt install php7.0-gmp
Install Composer
Composer is a dependency management tool for PHP. We’ll need it since we’re building Invoice Ninja from Github repository. Following command will install it.
curl -sS https://getcomposer.org/installer -o composer-setup.php
php composer-setup.php --install-dir=/usr/local/bin --filename=composer
Install Invoice Ninja
As I said before, we’re cloning Invoice Ninja from Github repository. This will make sure we’re getting the latest version of software. But before you do that, log out of the root account and login as your domain’s admin user. Then change to home directory.
cd $HOME
Following command will clone Invoice Ninja to your domain’s home directory. It’ll create a directory named invoiceninja in the home directory.
git clone https://github.com/invoiceninja/invoiceninja.git
Navigate to Invoice Ninja directory
cd invoiceninja
Now install Invoice Ninja with Composer,
composer install
Configure Document Root
Virtualmin configure nginx to serve files from public_html directory. But Invoice Ninja serves its public content from its own public directory. As a way around this, we’ll create symlink between public_html directory and Invoice Ninja public directory. Start by removing public_html directory.
rm -rf $HOME/public_html
Create the symlink,
ln -s $HOME/invoiceninja/public $HOME/public_html
This will serve Invoice Ninja public directory content on domain’s public_html directory. We’re almost done. There’s a one last thing we need to take care of.
Configure Nginx for Invoice Ninja
Now we’ll add Nginx rewrite rules for Invoice Ninja. You need to execute these commands as root user. So login to server as root and open Nginx configuration file for the domain with following command.
nano /etc/nginx/sites-available/example.com.conf
Replace example.com with your domain name. Look for following line within the file.
fastcgi_param HTTPS $https;
And paste these rules BELOW that line,
location / {
    try_files $uri $uri/ /index.php?$query_string;
}
Save and close file by hitting Ctrl+X and then Y. Then restart nginx web server,
service nginx restart
Run Invoice Ninja Setup Wizard
Open your domain in the browser to complete the installation. You’ll see a page like below.
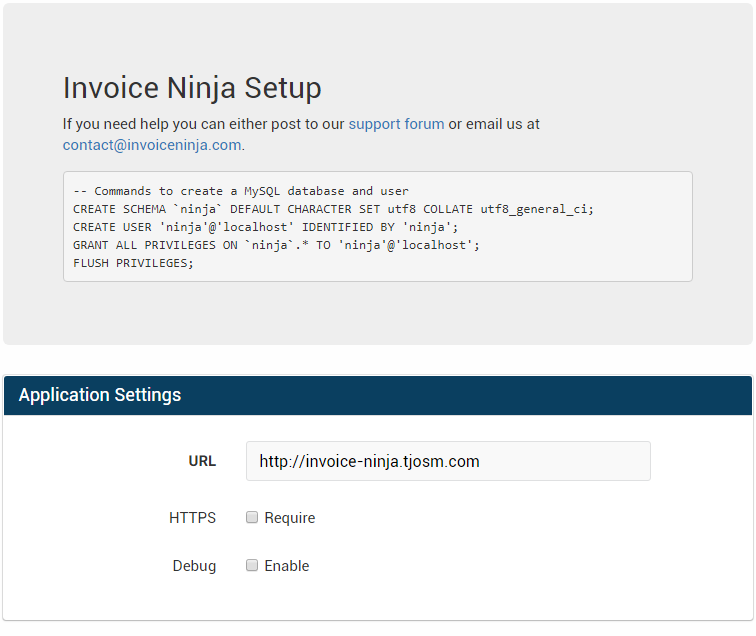
Page has instructions to create a new MySQL database for Invoice Ninja. But you don’t need to do it. Virtualmin already did it for you when you were adding your domain to Virtualmin. You can get MySQL credentials from Virtualmin. Another important setting on setup wizard is Email Settings. I suggest using Mailgun. They have better deliverability in my experience. And there’s a free plan too.
That concludes the instructions to install Invoice Ninja on
Ubuntu 20.04
VPS with Virtualmin and Nginx. Create a topic on sysadmin forum if you have issues with the installation.

Hi, love the work done on this blog.
I came across this script searching installing invoice ninja on virtualmin.
However, I was looking for the steps for Virtualmin installation on Centos 7 with aphache 2.
Thanks 🙂 And sorry, almost all my posts are for Ubuntu Nginx and VIrtualmin.
Not an issue.
Thanks for the reply.
However, I have question regarding a feature of Virtualmin.
You mentioned in this blog that we need to logout of the root and login a virtual server user.
But how to get to the CLI to use it as user? I don’t see option to access the CLI in virtualmin GUI when logged in as a user.
Actually this post assumes that you’re using a SSH client like PuTTY to access your server. But Virtualmin also carry a terminal tool. I’ve never used it. But it should work too.

I realize that this feature is only available to root user. So you can just switch user account with su.
And when you’re done, you can type exit to return to root account.
Yes I realized that you were using SSH client while I looked into the video(youtube) above.
Also, $ su username does not work in virtualmin CLI. it keeps itself as root only.
However,I got it working through SSH client.
But, I ran into another issue with PHP 5.4.16. I think virtualmin is using it globally.
I have PHP 7.2 installed and the virtual server is using 7.2 in PHP version setting for public directory.
But still command php -v spits out the version 5.4.16 in output (that’s the reason I think virtualmin is using PHP 5.4.16 globally).
How do I use the PHP 7.2?
That’s not possible. PHP ended it’s support for v5.4 many many years ago. It’s not being used by anyone any more. What’s your OS? Virtualmin doesn’t ship with specific PHP version, the installation script installs the version bundled with the OS. So if you’re on Ubuntu 16.04 you should get PHP v7.0 and for Ubuntu 18.04, it’s PHP 7.2
centos 7. AH! my bad using it. But Virtualmin people mark it as Grade A OS for virtualmin.
Yes, indeed. I think this may be a mistake from their side. They should drop support for CentOS 7. Also most my guides won’t work for any of CentOS versions. The configuration file locations and commands are different than Ubuntu.
Yes that I realized. I am little familiar with centos 7, that’s the reason I chose it.
I am not hesitant to use ubuntu 18.04 LTS but on virtualmin forum they have clearly better support for centos7.
Probably, because of many virtualmin pro users are on centos OS. Not sure though.