Flarum is a modern forum software. It is extremely lightweight and faster than most, if not all forum software out there. If you want your community to be simple, fast and mobile friendly, Flarum is the software you’re looking for. This post will show you how to install Flarum on
Ubuntu 20.04
VPS with Virtualmin control panel & Nginx.Flarum is an open source project. It’s being actively developed on Flarum Core Github repository. Though still in its beta stages, this one is definitely a one for the future.
Installing Flarum on an
Ubuntu 20.04
VPS is fairly straight forward. This tutorial will guide you through it. By following this Flarum installation guide, you’ll build your web server withVirtualmin v7.1 GPL
,Nginx v1.22
,PHP v8.0
andMySQL v8
. This guide will always install latest version of Flarum on your VPS. So let’s get right into it.Hire me and have your Flarum forum ready within 24 hours!
Get Flarum Installed
Prerequisites
You’ll need a VPS for Flarum. This guide assumes you have a clean
Ubuntu 20.04
VPS. You can get one from my recommended VPS providers, if don’t have one already. Once you get a VPS, you need to complete below steps.Completing above steps build a perfect environment for your Flarum community. I highly recommend completing all steps whether they are optional or not.
Prepare VPS for Flarum
Although your VPS is ready for most php apps by now, Flarum has a special requirement. It uses Composer to manage its dependencies and extensions. Composer installation isn’t covered by prerequisites. So let’s take care of that.
Install Composer
Composer is a dependency management tool for PHP. Following commands will install it on your VPS. You need to execute these commands as the root user.
curl -sS https://getcomposer.org/installer -o composer-setup.php
php composer-setup.php --install-dir=/usr/local/bin --filename=composer
Install Flarum
Now we can install Flarum with Composer. This need to be done with your Flarum domain’s admin user. This is the user Virtualmin created for you when adding your domain on prerequisites. Using root user account will lead into permission errors later on. So switch to domain admin user and navigate to home directory.
cd $HOME
Virtualmin creates a public_html directory for each domain you add. This is where Flarum core content should be served from. But the command we’re going to execute shortly requires this directory to be empty. We’ll remove public_html directory entirely to be compatible with this requirement.
rm -rf $HOME/public_html
Following command will create public_html directory again and download Flarum package to it.
composer create-project flarum/flarum public_html --stability=beta
Navigate to public_html directory.
cd public_html
Install Flarum with Composer.
composer install
That should get Flarum up on your domain. But we’re not done yet. We need to configure nginx for Flarum.
Configure Nginx for Flarum
Flarum needs special rewrite rules to work with Nginx web server. These rules are mainly for URL rewriting. We’ll be adding nginx rewrite rules provided by official Flarum documentation. You should switch to server root account again for this part. So log back into root account and open nginx configuration file for the domain with this command.
nano /etc/nginx/sites-available/example.com.conf
Change example.com with your Flarum domain name. Look for following line within the file (Ctrl+W).
fastcgi_param HTTPS $https;
And paste these nginx rewrite rules BELOW it.
    location / { try_files $uri $uri/ /index.php?$query_string; }
    location /api { try_files $uri $uri/ /api.php?$query_string; }
    location /admin { try_files $uri $uri/ /admin.php?$query_string; }

    location ~* ^/(composer\.(json|lock)|config\.php|flarum|storage|vendor) {
        deny all;
        return 404;
    }

    location ~* \.html$ {
        expires -1;
    }
Close the file by hitting Ctrl+X. And then restart nginx with following command.
service nginx restart
Good job. You’re through the hard part of the installation.
Run Flarum Setup Wizard
You’re almost done installing Flarum on your
Ubuntu 20.04
VPS. Now open your Flarum domain in browser. You’ll see a page like this.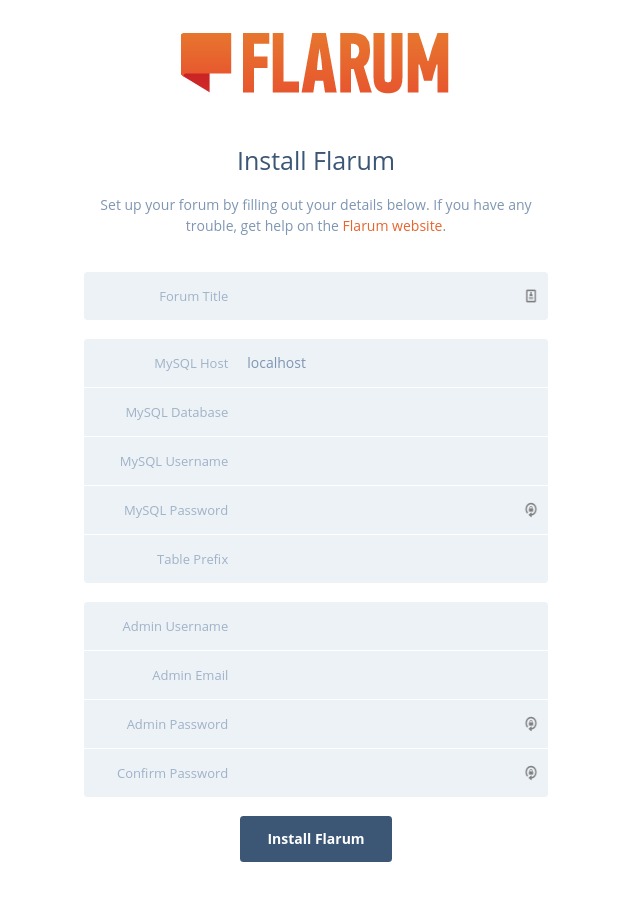
As you can see, you’re being asked for MySQL credentials. Virtualmin automatically creates a new MySQL database for each domain you add. You can easily obtain MySQL credentials from Virtualmin.
That concludes the instructions to install Flarum on
Ubuntu 20.04
VPS with Virtualmin and Nginx. Create a topic on sysadmin forum if you have issues with the installation.