I’ve previously covered installing Sendy on an Ubuntu 20.04
The reason that tutorial doesn’t work is due to nginx rewrite rules. Nginx rewrite rules on that tutorial doesn’t work for subdirectories. The installation process is similar. But we’ll upload Sendy files to a subdirectory instead of public_html directory. And there is a slight difference in nginx rewrite rules which makes it all work. So let’s install Sendy on a subdirectory with Nginx.
Why not hire me to install it for you?
Get Sendy Installed
Prerequisites
These prerequisites are for a fresh server setups. I know there is a good chance you’ve already configured your VPS following one of my previous tutorials. In that case you can skip to the next section. And for the people who’s starting fresh, you need to get a Ubuntu 20.04
Completing above steps will configure your VPS with Virtualmin v7.1 GPL Nginx v1.22 PHP v8.0 MySQL v8
Upload Sendy to the Server
We’ll start by creating a directory inside public_html to hold Sendy. I’ll call this directory email. So login to your VPS as domain admin user and create a directory named email with this command.
mkdir $HOME/public_html/email
Now connect to your server with Filezilla and upload Sendy files to the directory you just created. Remember to use domain admin user for this as well. Using root account will result in permission errors later on.
Create a MySQL database for Sendy
Virtualmin automatically creates a MySQL database for each virtual server you create. But it’s not going to be enough for us here since we’re hosting two apps on same virtual server. Fortunately, creating a new database is easy with Virtualmin. Login to Virtualmin and select your domain. And then click ‘Edit Databases’. From there, you’ll see a button to create a new database.
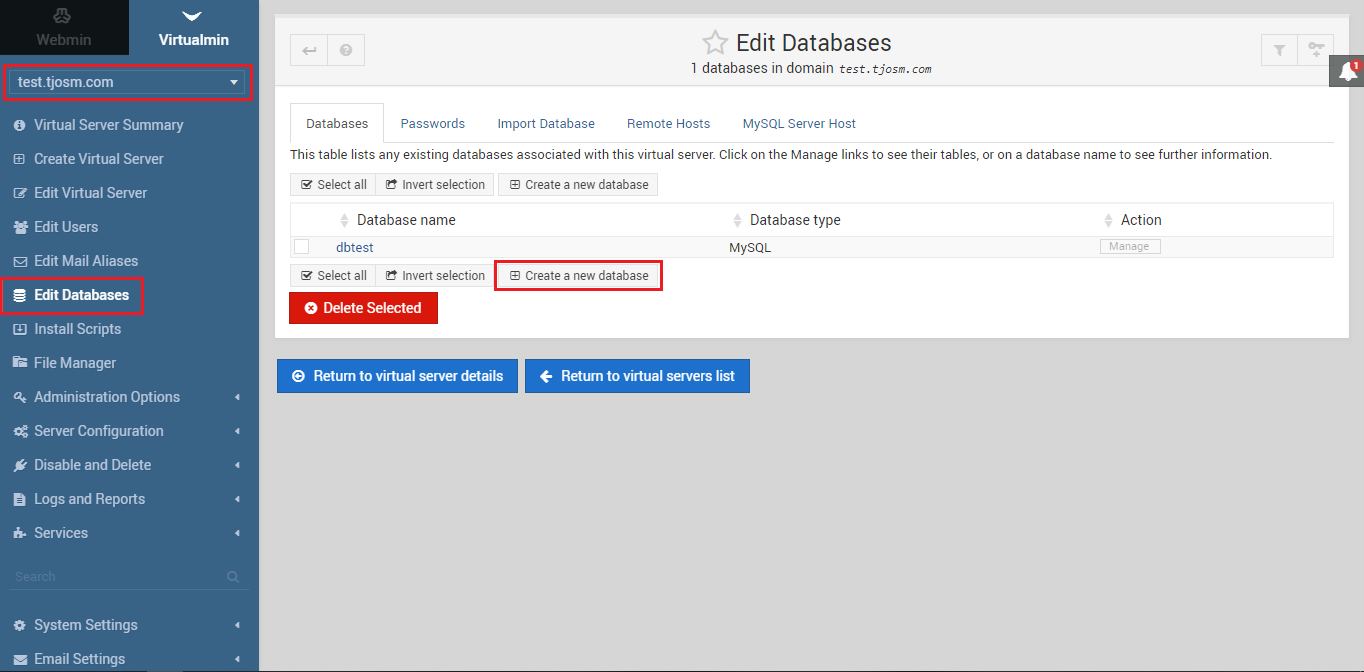
This will create a new MySQL database for the selected domain. Both databases will have user assigned to them. Which is the domain’s admin user.
Prepare Sendy for Installation
Now that everything is ready on the server, we need to make some changes to Sendy config.php file. This is the file that holds MySQL credentials. Open Sendy config.php with nano text editor.
nano /home/AdminUser/public_html/email/includes/config.php
Search for following line and replace your_sendy_installation_url with your domain name.
define('APP_PATH', 'https://example.com/email');Then search for following lines and add database credentials within apostrophe marks. You can get MySQL database credentials from Virtualmin.
	$dbHost = ''; //MySQL Hostname
	$dbUser = ''; //MySQL Username
	$dbPass = ''; //MySQL Password
	$dbName = ''; //MySQL Database Name
Close the file with Ctrl+X keys. Now change permissions of the uploads directory to 777.
chmod -R 777 /home/AdminUser/public_html/email/uploads
Add nginx Rewrite Rules for Sendy on Subdirectory
Open virtual host file for the domain with nano text editor. Replace example.com with your domain or sub domain. You need to be logged in as root for this part.
nano /etc/nginx/sites-available/example.com.conf
Search for following line,
fastcgi_param HTTPS $https;
And paste following rules below it in a new line.
location ^~ /email {
root /home/AdminUser/public_html/;
     error_log /var/log/nginx/sendy.error.log;
     index index.php index.html index.htm;
     try_files $uri $uri/ $uri.php?$args;
     rewrite ^/email/w/([a-zA-Z0-9/]+)$ /email/w.php?i=$1 last;
     rewrite ^/email/l/([a-zA-Z0-9/]+)$ /email/l.php?i=$1 last;
     rewrite ^/email/t/([a-zA-Z0-9/]+)$ /email/t.php?i=$1 last;
     rewrite ^/email/subscribe/([a-zA-Z0-9/]+)$ /email/subscribe.php?i=$1 last;
     rewrite ^/email/unsubscribe/([a-zA-Z0-9/]+)$ /email/unsubscribe.php?i=$1 last;
     location ~ \.php$ {
              try_files $uri =404;
              fastcgi_pass unix:/var/php-nginx/XXXXXXXXXXXXXX.sock/socket;
     }
}
Now before you save this file, there are couple of changes you should make. First you need to change the AdminUser. Then change the email if you used a different directory. Finally change XXXXXXXXXXXXXX with your socket number. You can find this number within the same file. This is how file should look like after making changes. Note the socket number.

Close the file and restart nginx.
systemctl restart nginx.service
Install Sendy on a Subdirectory with nginx
Sendy should be ready to be installed now. You can run the compatibility check to see if you’re setup everything properly. Compatibility check script is available from,
http://example.com/email/_compatibility.php?i=1
Now open your Sendy URL on browser. You’ll see a page similar to this image.
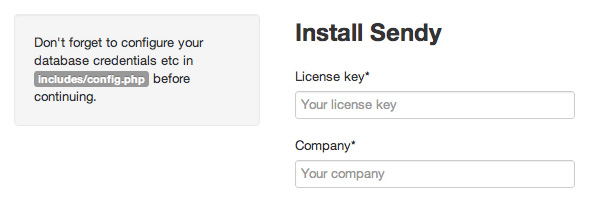
Follow the instructions on that page to complete the Sendy installation. Once you do that Sendy installation is complete for the most part. But Sendy requires Cron jobs set up for campaign scheduling and autoresponders.
Setup Sendy Cron Jobs
Virtualmin gives a nice GUI to create and manage cronjobs at Webmin > System > Scheduled Cron Jobs. But I find it easier to do it from command line. So login to your VPS as domain admin user and execute following command.
crontab -e
You’ll be asked to select an editor if this is your first time editing crontab. Select the easiest option which is Nano. Then add following rules towards the end of the file.
*/5 * * * * php /home/AdminUser/public_html/email/scheduled.php > /dev/null 2>&1
*/1 * * * *  php /home/AdminUser/public_html/email/autoresponders.php > /dev/null 2>&1
*/1 * * * *  php /home/AdminUser/public_html/email/import-csv.php > /dev/null 2>&1
These two rules execute commands for Sendy campaign scheduler and Sendy autoresponder. Autoresponder is called every minute and scheduler is called every 5 minutes. Close the file. Your Sendy should be fully configured now.
If you have issues with these instructions or the installation create a topic on server administration forum.